Search Results For: /2
Sensei LMS has native functionality that enables you to import courses, lessons and questions. For first-time course creators, this means you can get started more quickly by importing course content during setup, while existing sites can update their course content more easily.
Create CSV File(s)
To import new content or update existing content, you need one or more CSV files containing the necessary information. There are a few options available to you:
- Export the content using our native exporter.
- Download CSV files with sample data for courses, lessons or questions, and update the data using spreadsheet software like Microsoft Excel or Apache OpenOffice.
- Use your own CSV files. Any information you wish to include should follow the formatting and structure of the course, lesson or question import schema.
General Guidelines
- CSVs should be in UTF-8 format.
- Courses, lessons and questions can be uploaded individually or simultaneously, but need to be uploaded together if there are any dependencies between files.
- To update existing content, specify a value in the Slug column. If content with this slug is found, it will be overwritten.
- If a teacher is not specified or not found when importing courses, the currently logged in user will be set as the teacher.
- Use
0(false) or1(true) in your CSV files when importing a boolean (true or false) value. - Multiple values in a field are separated with commas.
- Wrapping values in quotes enables you to insert a comma.
- Prefix the ID with
id:if referencing a new ID (e.g.id:100). - Category hierarchy is denoted with
>, and multiple categories are separated with commas.
Images
- Images need to be pre-uploaded to the Media Library or available online in order to import them.
- External URLs are supported and are imported to the Media Library.
- You can use the filename if the image already exists in the Media Library.
Import Content
- Go to Sensei LMS > Import:

- To import courses, click the Upload button beside Courses CSV File, and select the import file from your computer. Repeat this step for lessons and questions, if applicable, and then click the Continue button:

- Wait until the importer is finished. Do not refresh or otherwise interfere with the browser while the import is in progress.
- Once the import process has completed, you will be taken to a confirmation page. If any issues were encountered while importing, they will be displayed here:

Failed Imports
If content failed to import, it means that an unrecoverable error was encountered. This can happen if a required field is missing, for example.
To help you find the problem, the CSV filename, title of the course / lesson / question, line number and error are displayed. After fixing the CSV file and removing any rows that have already been imported, you can run the import process again.
Partial Imports
A partial import indicates that the content was created or updated, but some problem occurred that prevented it from being fully imported. Examples of partial imports include specifying a course or lesson prerequisite that wasn’t found, or providing an invalid URL for a featured image.
To help you fix partially imported content, a link to the content, as well as the line number in the CSV file and the warning are displayed. Clicking on any of the links will open the content in a new tab, where you can make the necessary updates.
Learner Management enables you to manage everything about your learners, from enrolling new learners to resetting their progress.
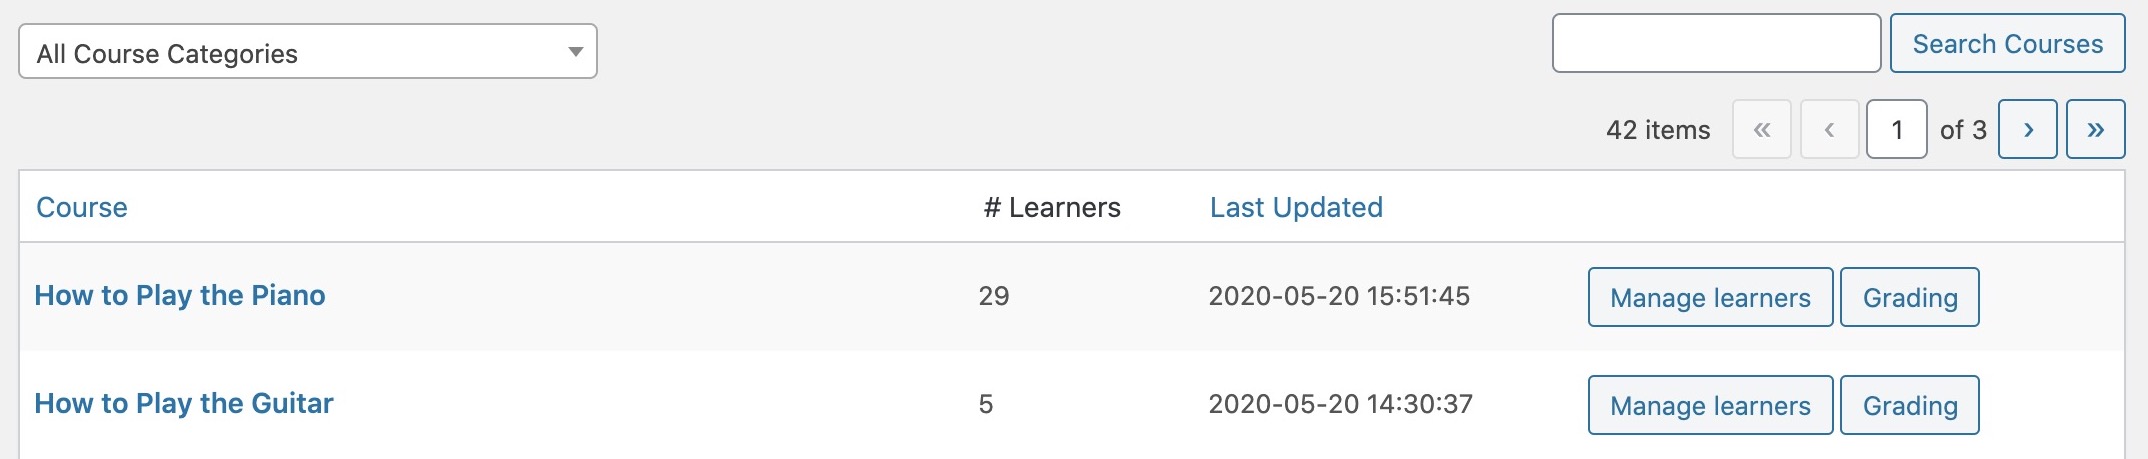
Go to Sensei LMS > Learner Management to see a list of courses. You can filter by course category or search for a particular course:
From here, learners can be managed by course or by lesson.
Manage Learners By Course
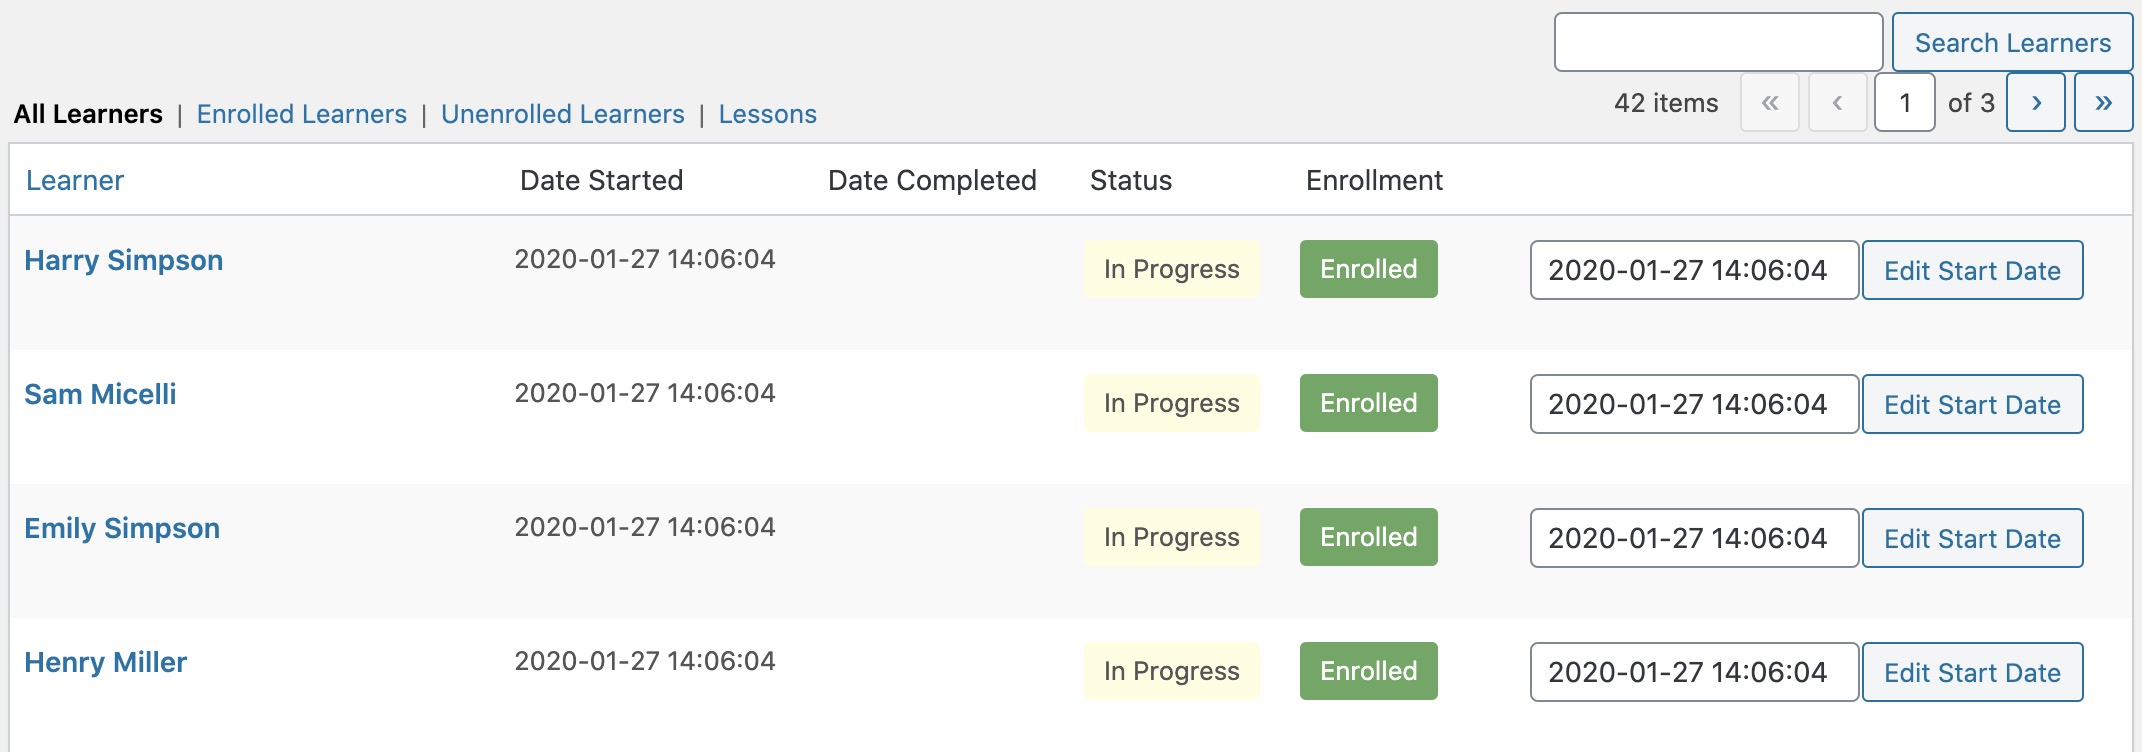
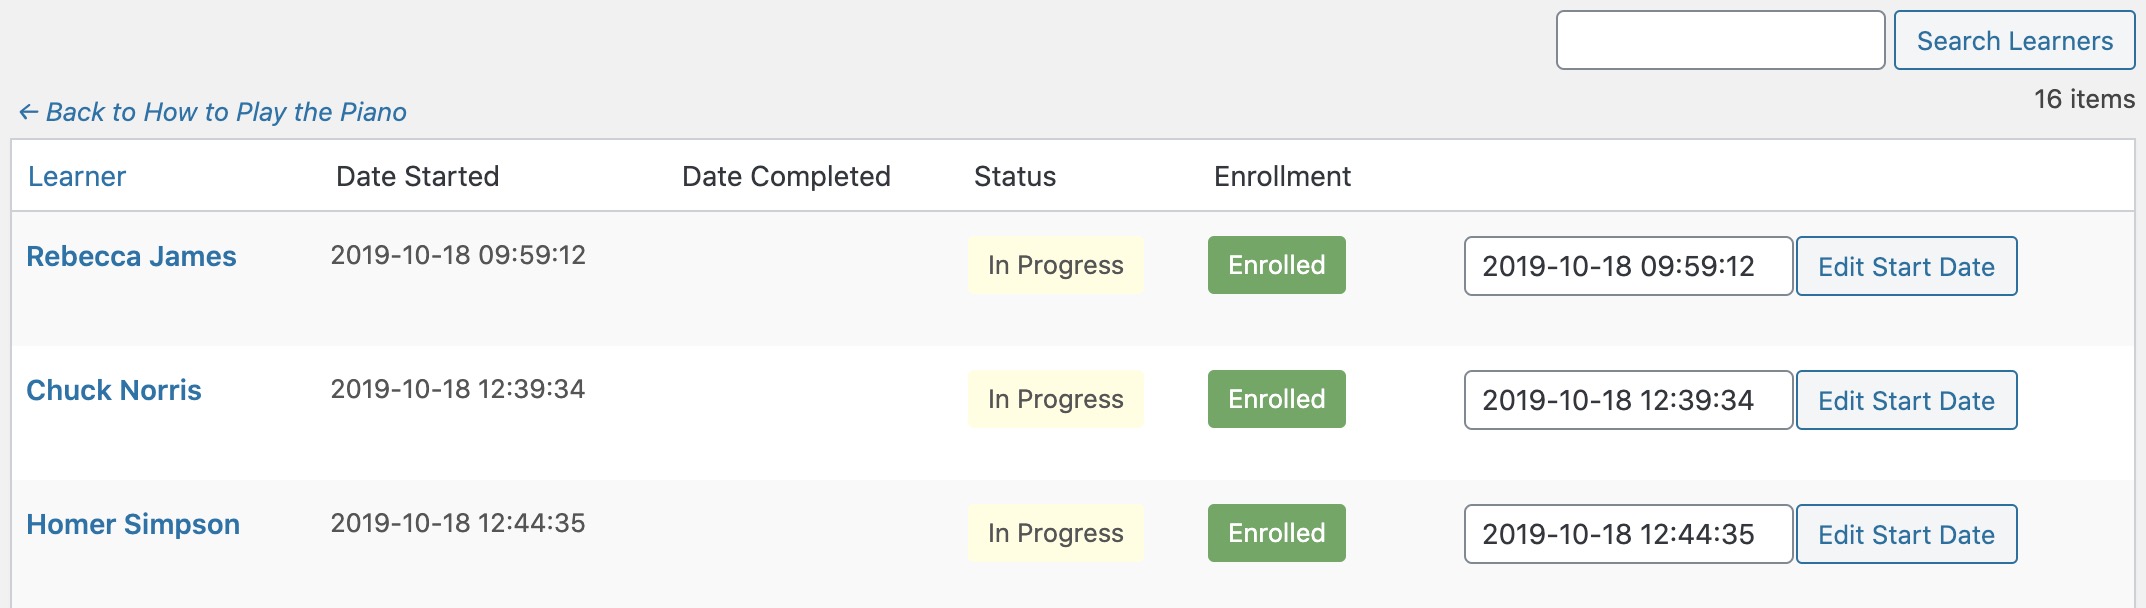
To manage your learners, locate the relevant course and click the Manage learners button. By default, a list of all learners who were ever enrolled in the course are displayed. This view can be filtered to only show those learners who are currently enrolled (Enrolled Learners), or only those who are unenrolled (Unenrolled Learners):
Remove a Learner from a Course
To remove a learner’s enrollment in a course, find the appropriate learner and hover over their name. Click the Remove Enrollment link that appears. This will unenroll the learner and revoke their access to the course:

Please note that while the learner no longer has access to the course, their progress is preserved. This means that they will be able to pick up where they left off should they enroll in the course again later.
Add a Learner to a Course
If a learner already appears in Learner Management, but are not currently enrolled in the course, they can be re-enrolled by hovering over their name and clicking the Enroll link:

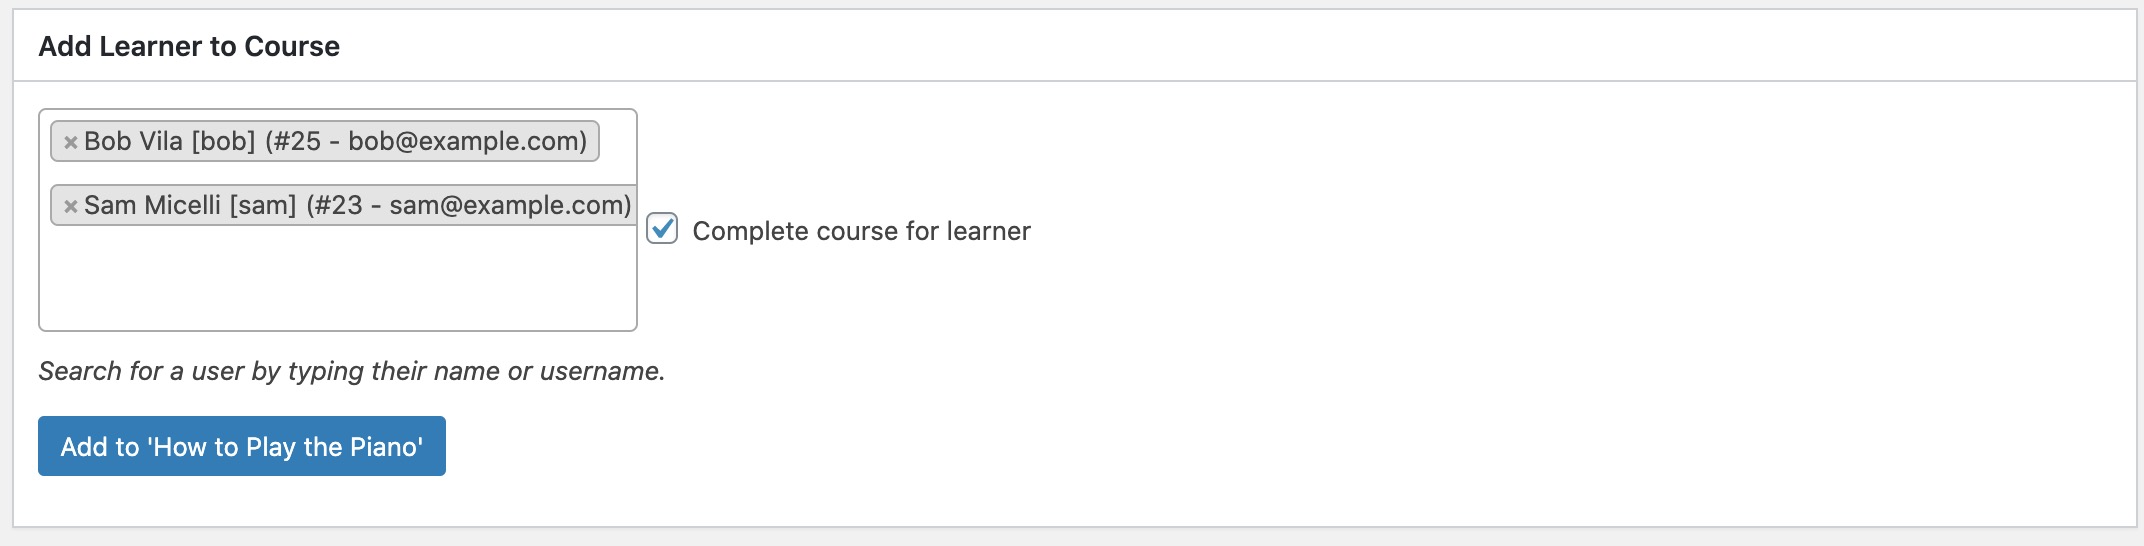
If a learner does not already appear in Learner Management, they can be added by scrolling to the bottom of the page, searching for and selecting them in the Add Learner to Course panel, and clicking the button. You can optionally choose to complete the course for the learner by checking the Complete course for learner box. Multiple learners can be added simultaneously:
Reset Progress
To reset a learner’s progress and have them start the course over from the beginning, find the learner, hover over their name, and click the Reset Progress link. This will reset the course start date and set its status to In Progress. All lessons in the course will have their start date cleared and status set to Not started.
Note that the Reset Progress link is only displayed if the learner is currently enrolled in the course.
Remove Progress
To remove a learner’s progress, find the learner, hover over their name, and click the Remove Progress link. This will remove the learner from Learner Management, effectively deleting any progress they have already made in the course. This means the learner will need to start the course over from the beginning should they enroll again later.
Note that the Remove Progress link is only displayed if the learner is not currently enrolled in the course.
Edit the Course Start Date
You can edit the course start date by locating the learner, clicking in the text box that displays the current start date, selecting a new date from the calendar that appears, and clicking the Edit Start Date button.
Note that updating the course start date does not have any effect on the start dates of the course’s lessons.
Manage Learners by Lesson
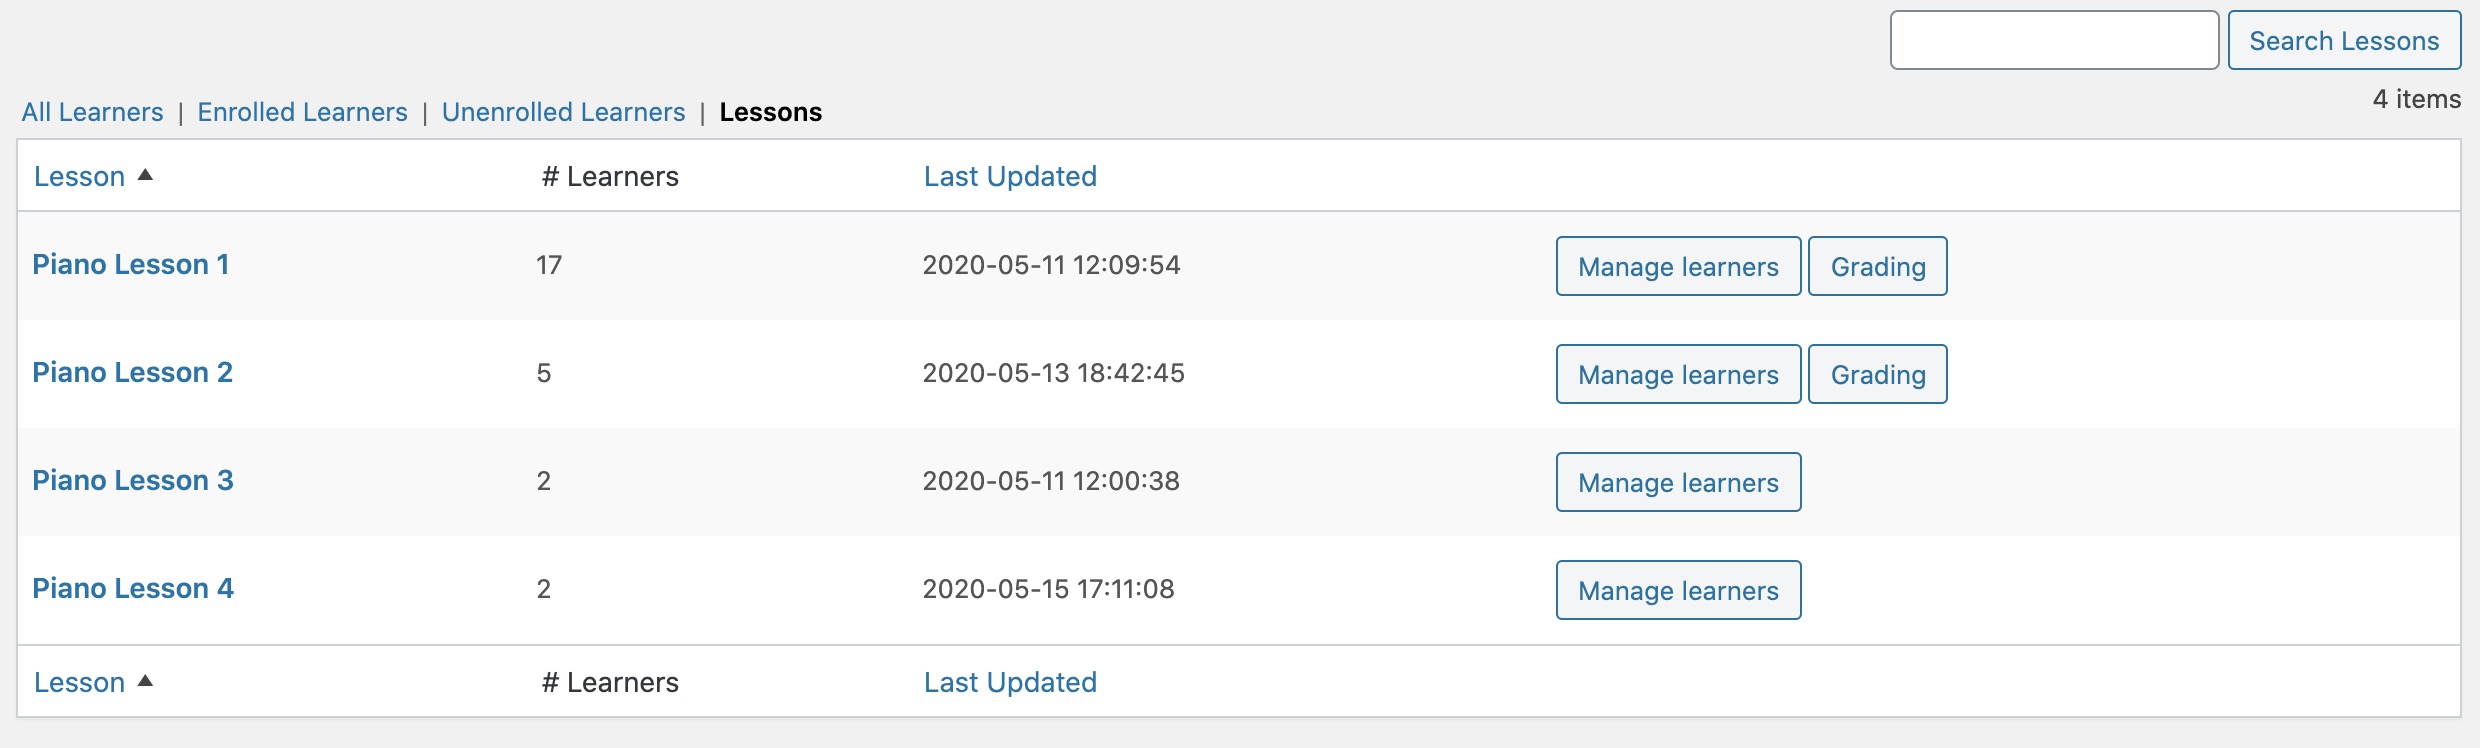
Clicking the Lessons link displays a list of all lessons in the course:
As with courses, the learners for an individual lesson can be managed by clicking the Manage learners button. By default, a list of all learners who ever viewed the lesson are displayed:
Add a Learner to a Lesson
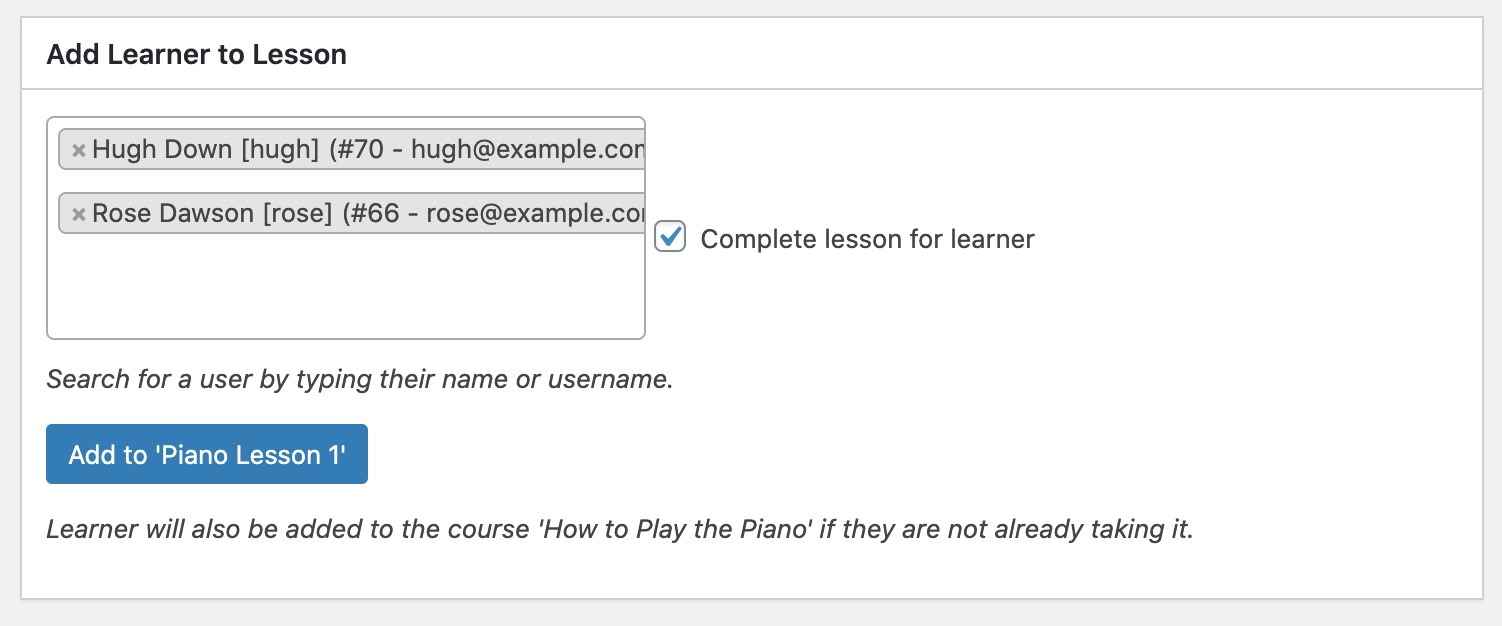
A learner can be added to the lesson by scrolling to the bottom of the page, searching for and selecting them in the Add Learner to Lesson panel, and clicking the button. This will also enroll the learner in the course if they are not already taking it. You can optionally choose to complete the lesson for the learner by checking the Complete lesson for learner box. If the lesson has a quiz, the learner will automatically pass it. Multiple learners can be added simultaneously:
Reset Progress
To reset a learner’s progress and have them start the lesson over from the beginning, find the learner, hover over their name, and click the Reset Progress link. This will reset the lesson status to In Progress. If the lesson has a quiz, this will also reset the learner’s grade for that quiz and remove their answers.
Edit the Lesson Start Date
You can edit the lesson start date by locating the learner, clicking in the text box that displays the current start date, selecting a new date from the calendar that appears, and clicking the Edit Start Date button.
Sensei LMS offers drill-down reporting for you to see how learners are progressing across all courses, lessons and quizzes. To access this area, go to Sensei LMS > Analysis.
There are three main areas in this section:
Learners
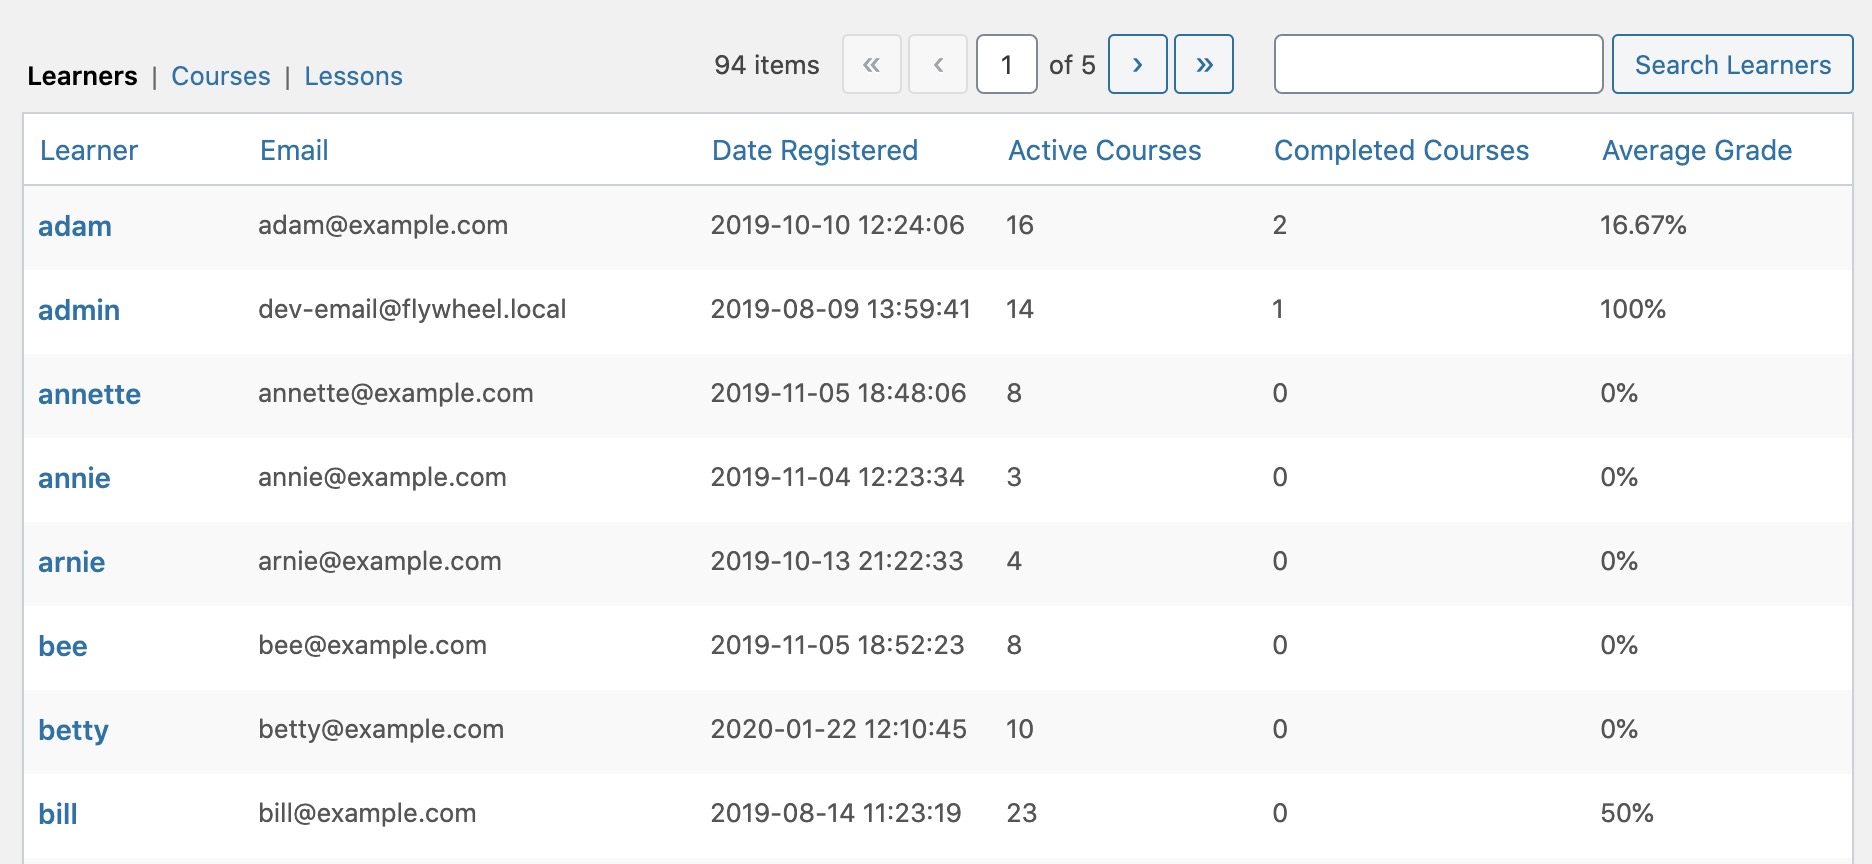
The default view of the Analysis page shows an overview of your learners and their stats, all of which can be exported:
- Learner – Learner’s username
- Email – Learner’s email address
- Date Registered – Date on which the learner registered on your site
- Active Courses – Number of courses the learner is currently enrolled in
- Completed Courses – Number of courses the learner has completed
- Average Grade – Learner’s average grade across all courses
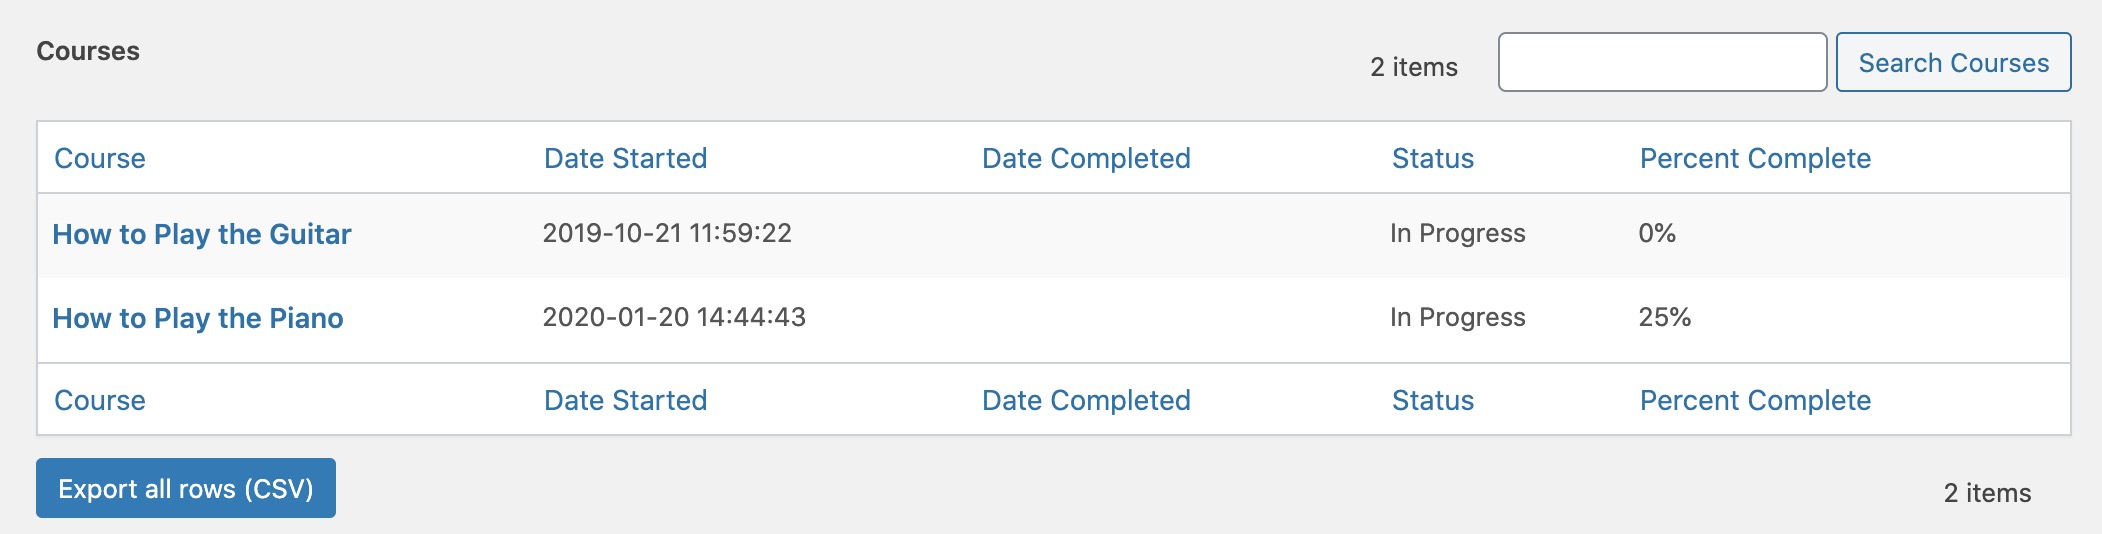
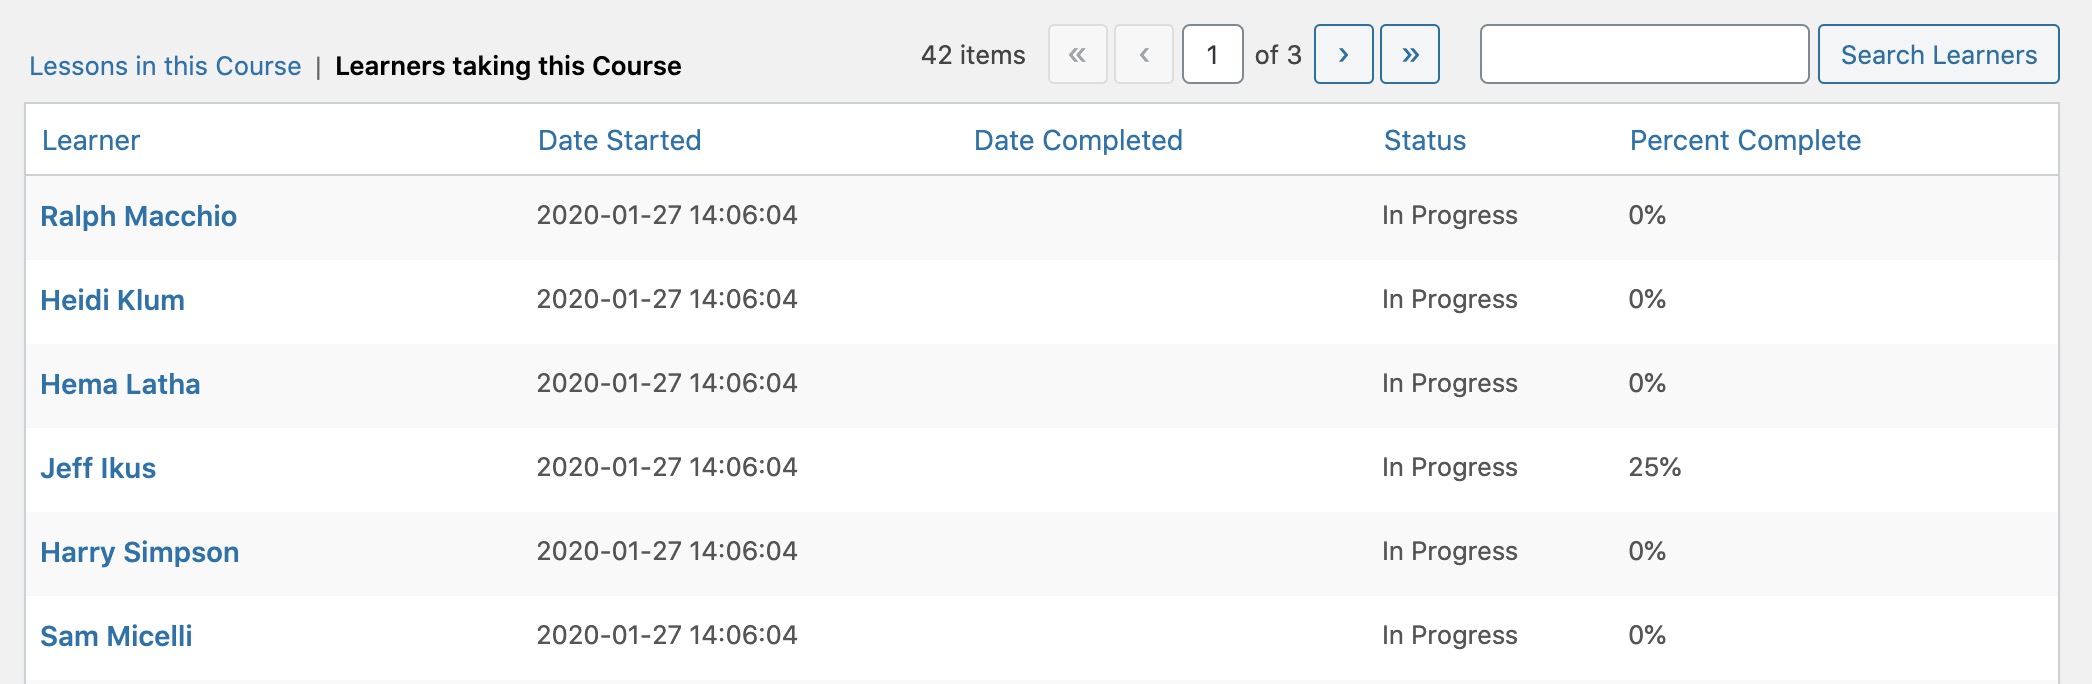
Drilling down into a particular learner displays a page that lists the following information:
- Course – Name of the course
- Date Started – Date on which the learner started the course
- Date Completed – Date on which the learner completed the course
- Status – Course status
- Percent Complete – Percentage of the course the learner has completed so far
Drilling down even further into a specific course displays the learner’s progress at the lesson level:
- Lesson – Name of the lesson
- Date Started – Date on which the learner started the lesson
- Date Completed – Date on which the learner completed the lesson
- Status – Lesson status
- Grade – Learner’s grade for that lesson, if applicable

The Other Learners taking this Course view shows all other learners currently enrolled in the course:
Courses
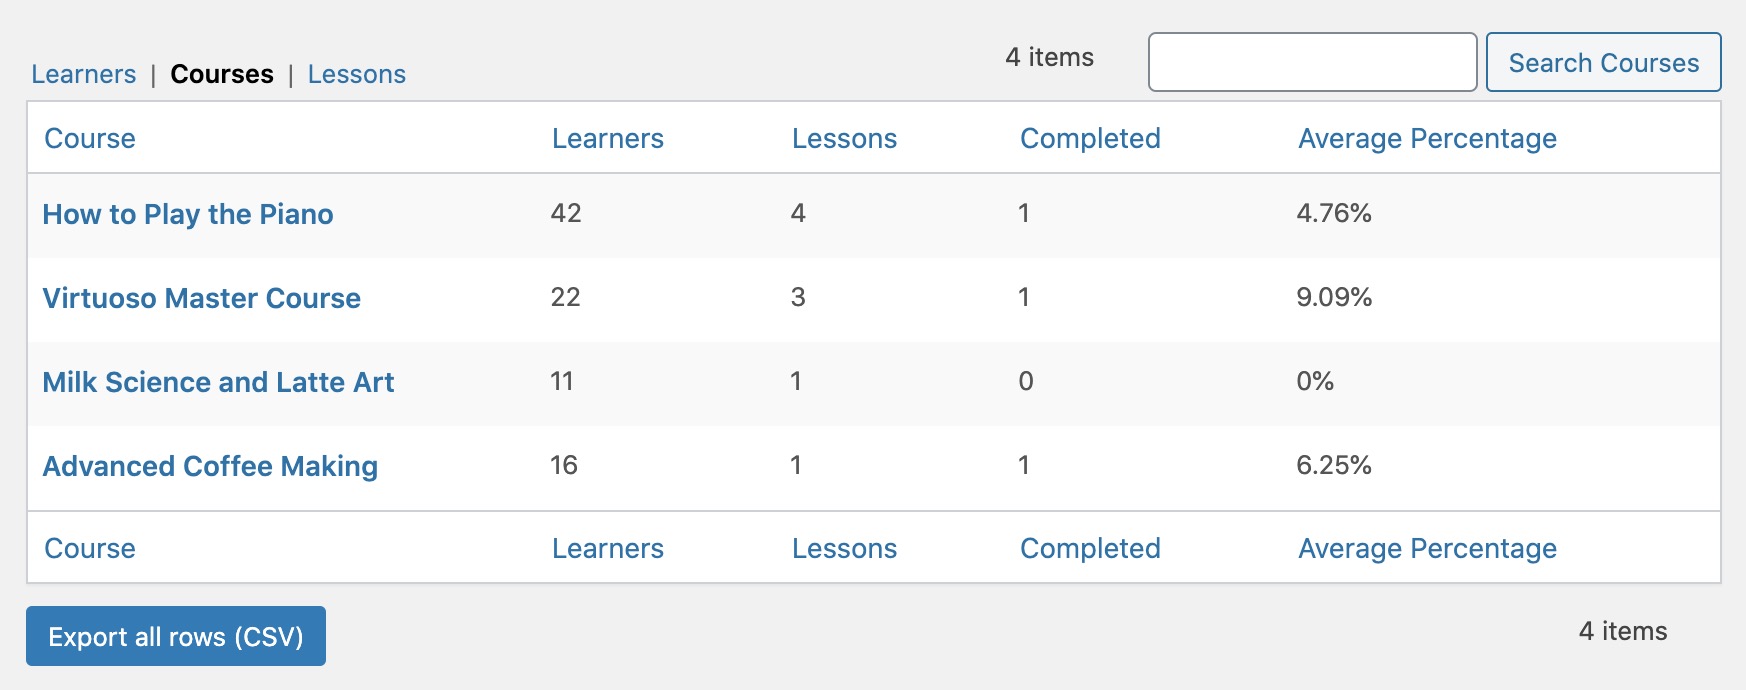
Similar to the Learners view, the Courses view displays an overview of your courses with some stats, all of which can be exported:
- Course – Name of the course
- Learners – Number of learners currently enrolled in the course
- Lessons – Number of lessons in the course
- Completed – Number of learners who have completed the course
- Average Percentage – Average percentage of the course across all learners
Drilling down into a particular course displays a page that lists all of the lessons in the course, as well as the following stats:
- Learners – Number of learners who are currently taking or have already completed the lesson
- Completed – Number of learners who have completed the lesson
- Average Grade – Average grade of the lesson, if applicable

The Learners taking this Course view shows all other learners currently enrolled in the course. The view is identical to this one.
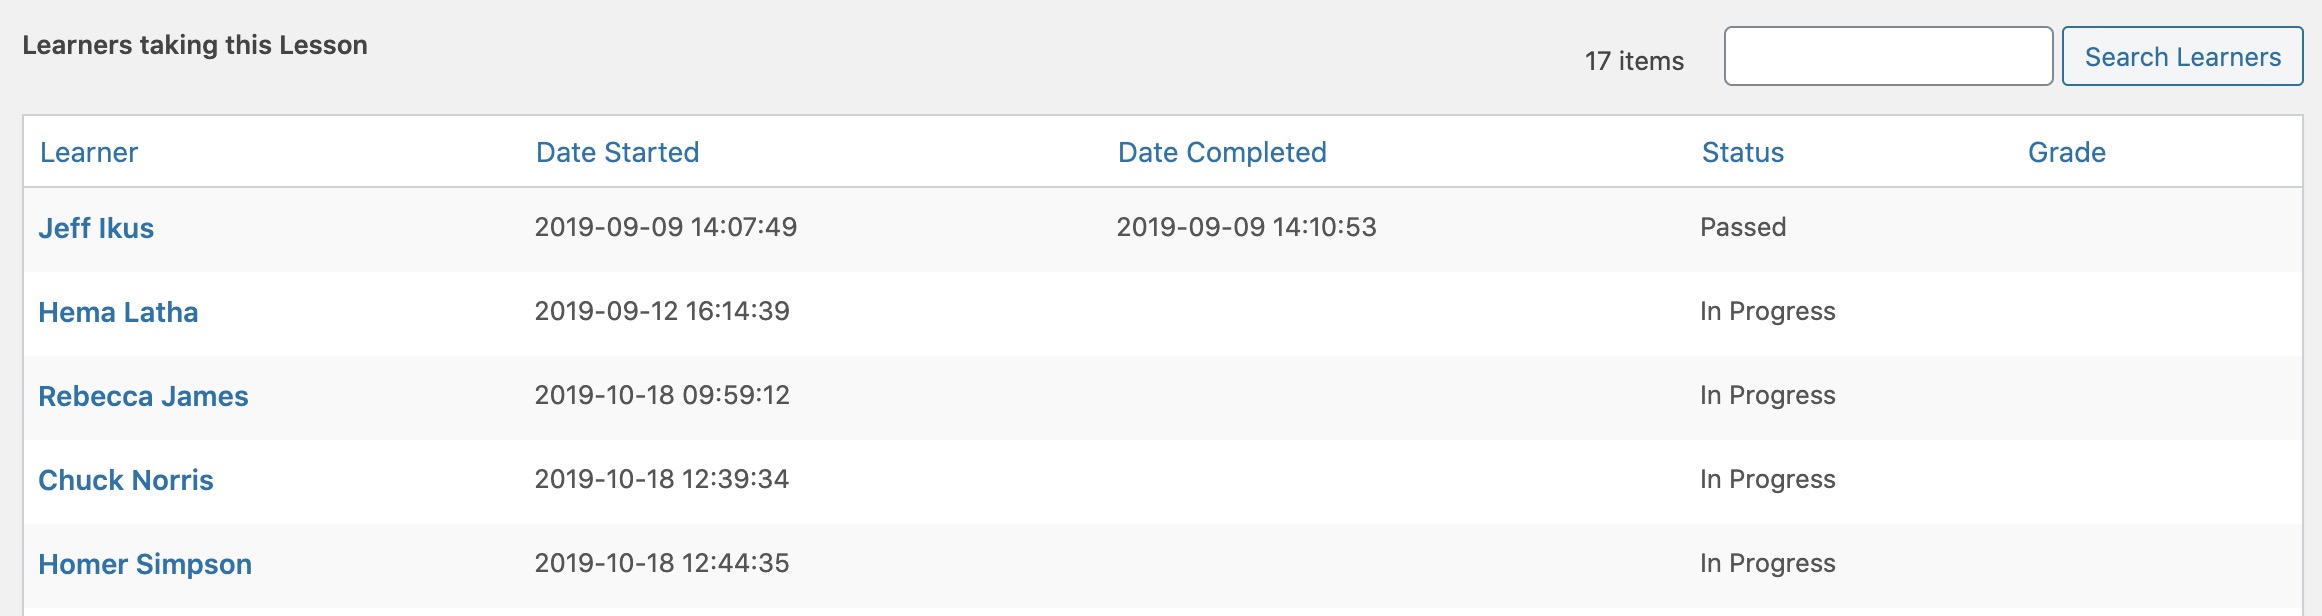
Drilling down even further into a specific lesson displays all learners who are currently taking or have already completed the lesson:
Lessons
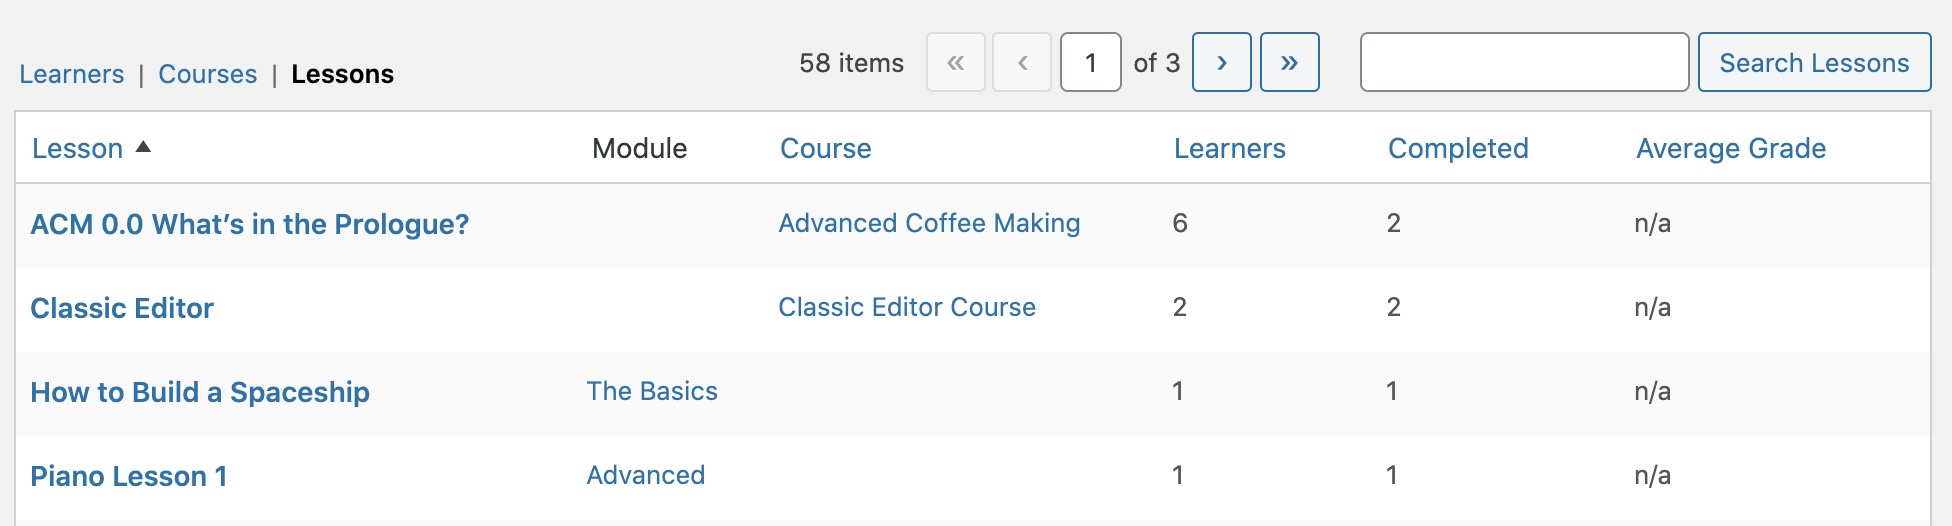
Much like the Learners and Courses views, the Lessons view displays an overview of your lessons with some stats, all of which can be exported:
- Lesson – Name of the lesson
- Module – Name of the module the lesson is in
- Course – Name of the course the lesson is in
- Learners – Number of learners who are currently taking or have already completed the lesson
- Completed – Number of learners who have completed the lesson
- Average Grade – Average grade of the lesson, if applicable
Drilling down into a particular lesson displays a page that lists all of the learners who are currently taking or have already completed the lesson. The view is the same as this one.
Questions can be added in one of two ways – by going to Questions > Add New, or by adding them directly to a quiz. Although this lesson covers the latter, configuring questions is the same regardless of which method is used.
To add questions to a quiz, create a new lesson by going to Lessons > Add New. You will see that the quiz block has already been added to the page for you. (Note: For managing questions using the legacy meta box rather than blocks, please refer to this documentation.)
Question Types
The default question type that is added to a quiz is multiple choice. You can change this by clicking inside the question and selecting an alternate type from the toolbar dropdown:

After selecting a question type, the editor will update to show the appropriate answer section for that type.
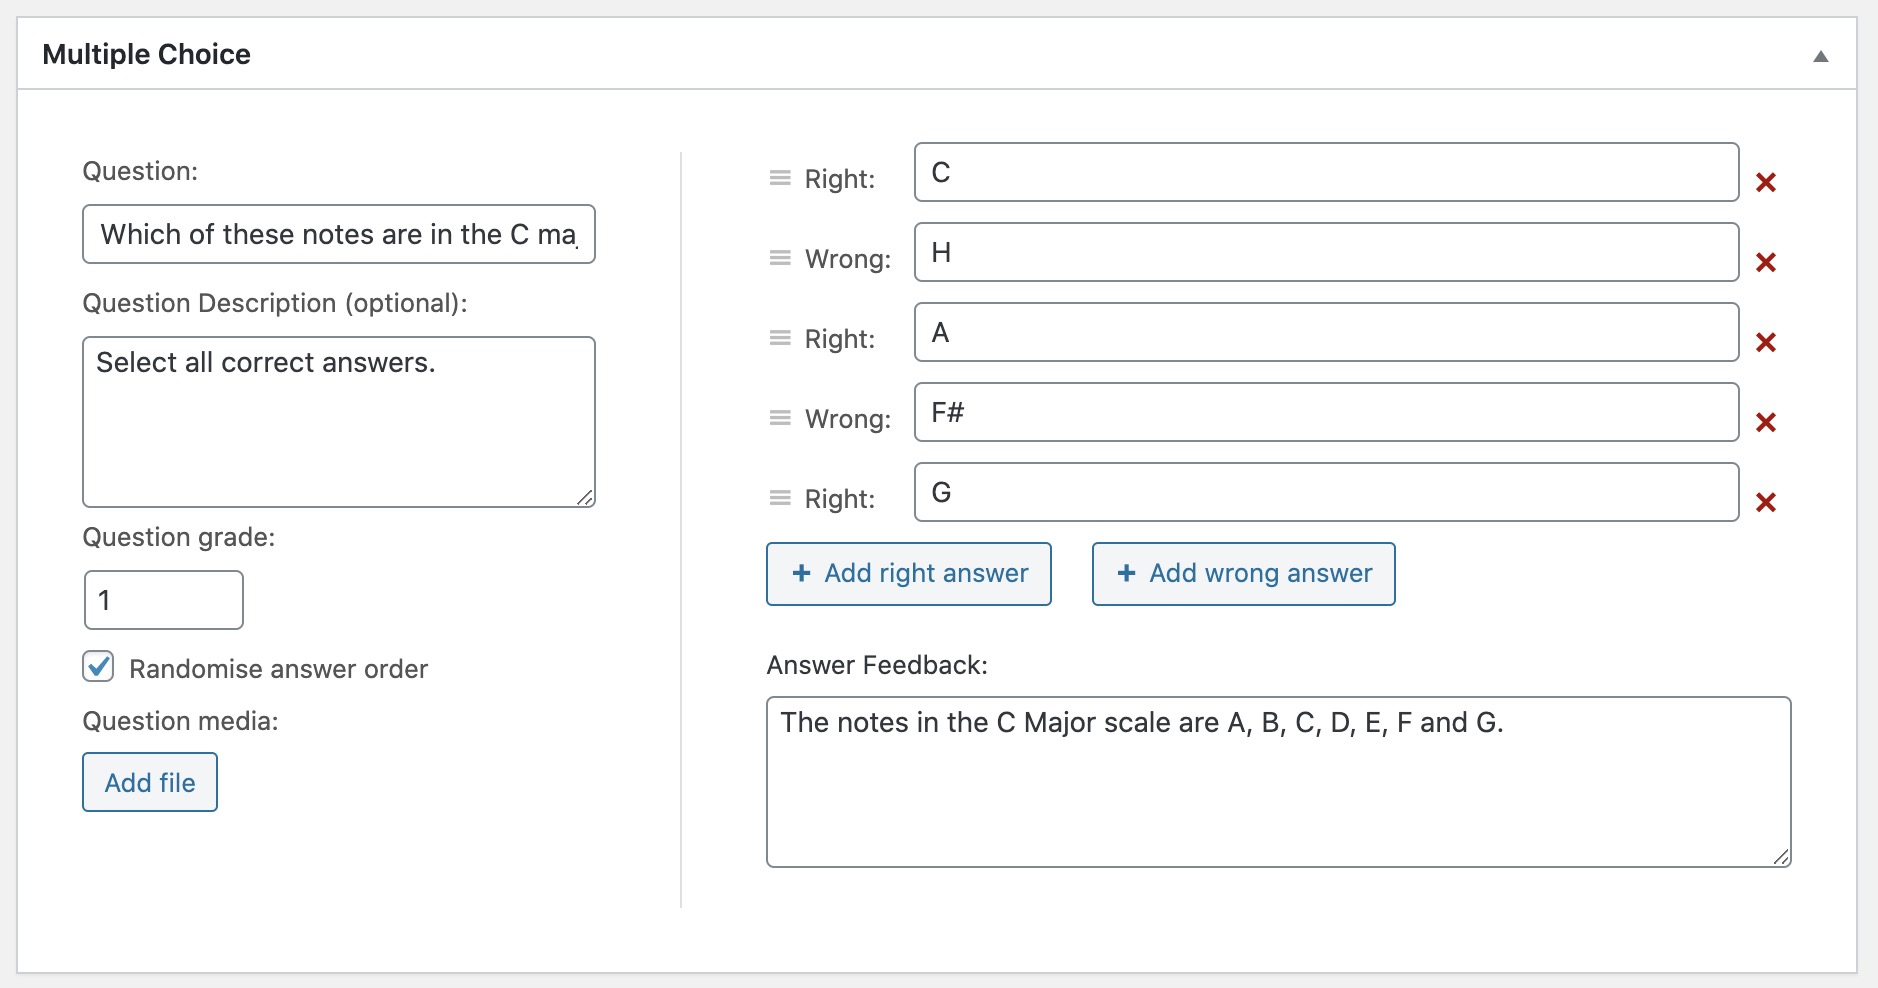
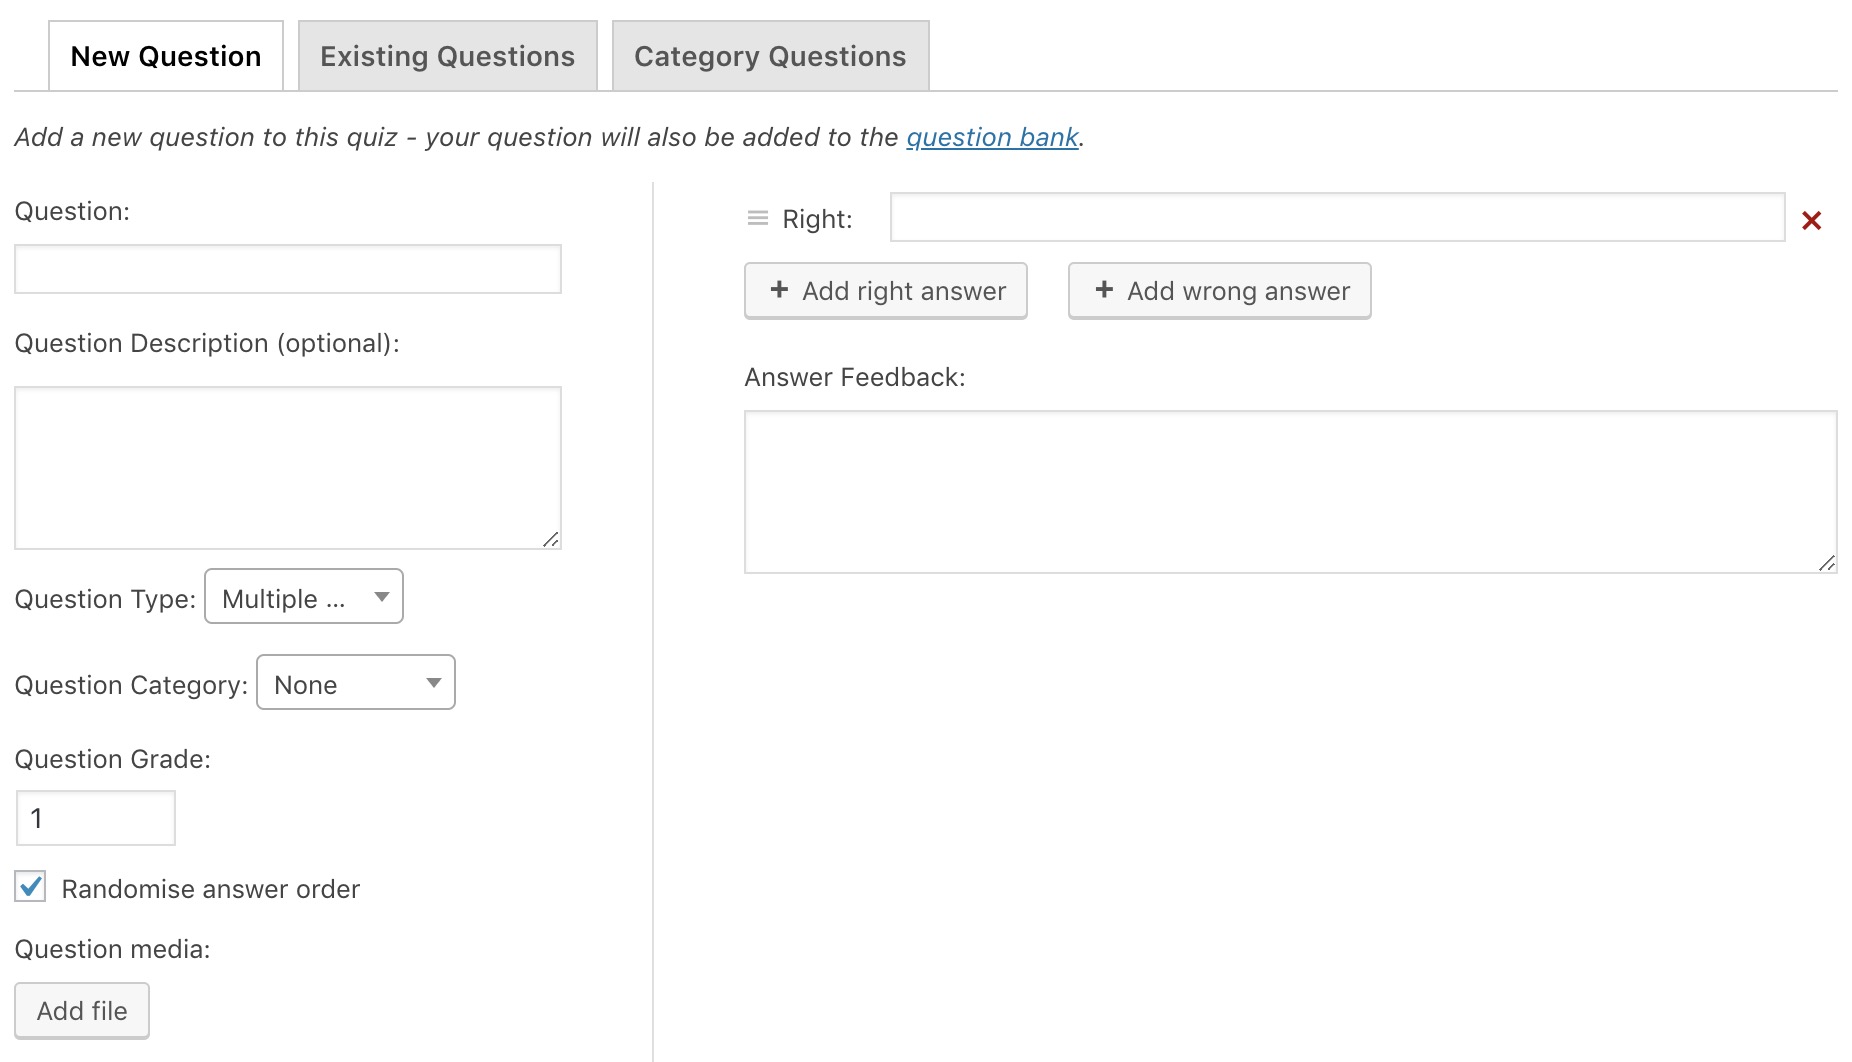
Multiple Choice
Multiple choice questions list a set of possible answers that the learner can choose from. This question type supports multiple correct and incorrect answers. If a question has more than one correct answer, the learner must select all of them in order to pass (if a passmark is required).
You can add as many answers as you like to a multiple choice question. Click the Right / Wrong toggles beside each answer to indicate whether that answer is correct or incorrect. If there is more than one correct answer, the radio buttons will change to check boxes:
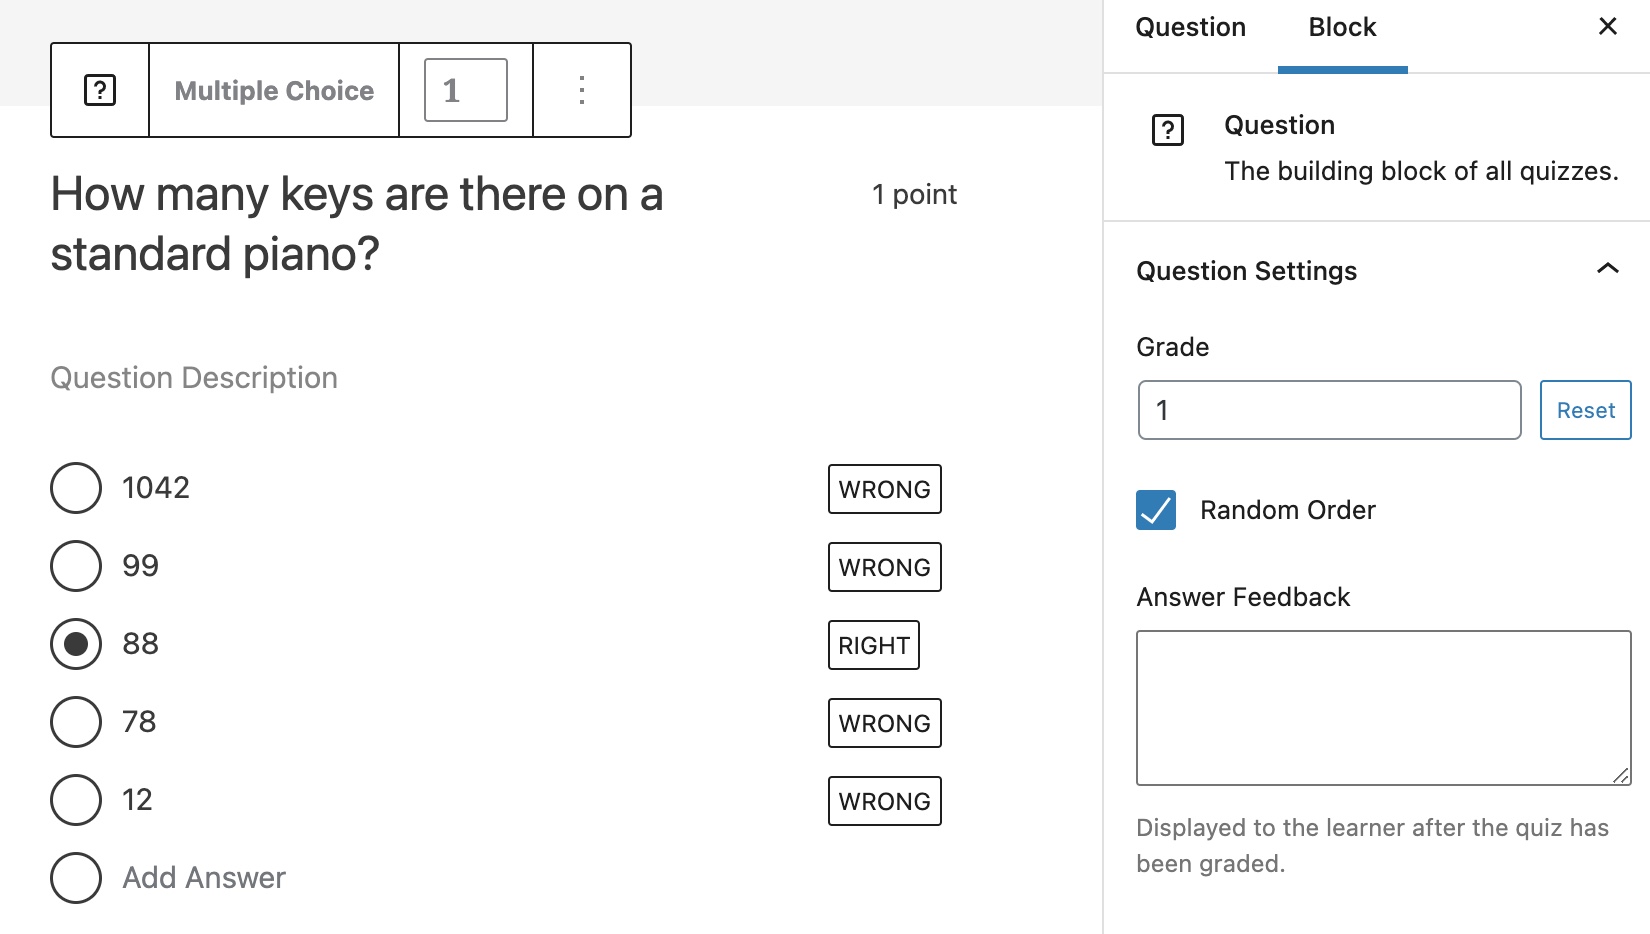
You can also show the answers in a different order every time the quiz is viewed by selecting the Random Order checkbox in the settings sidebar.
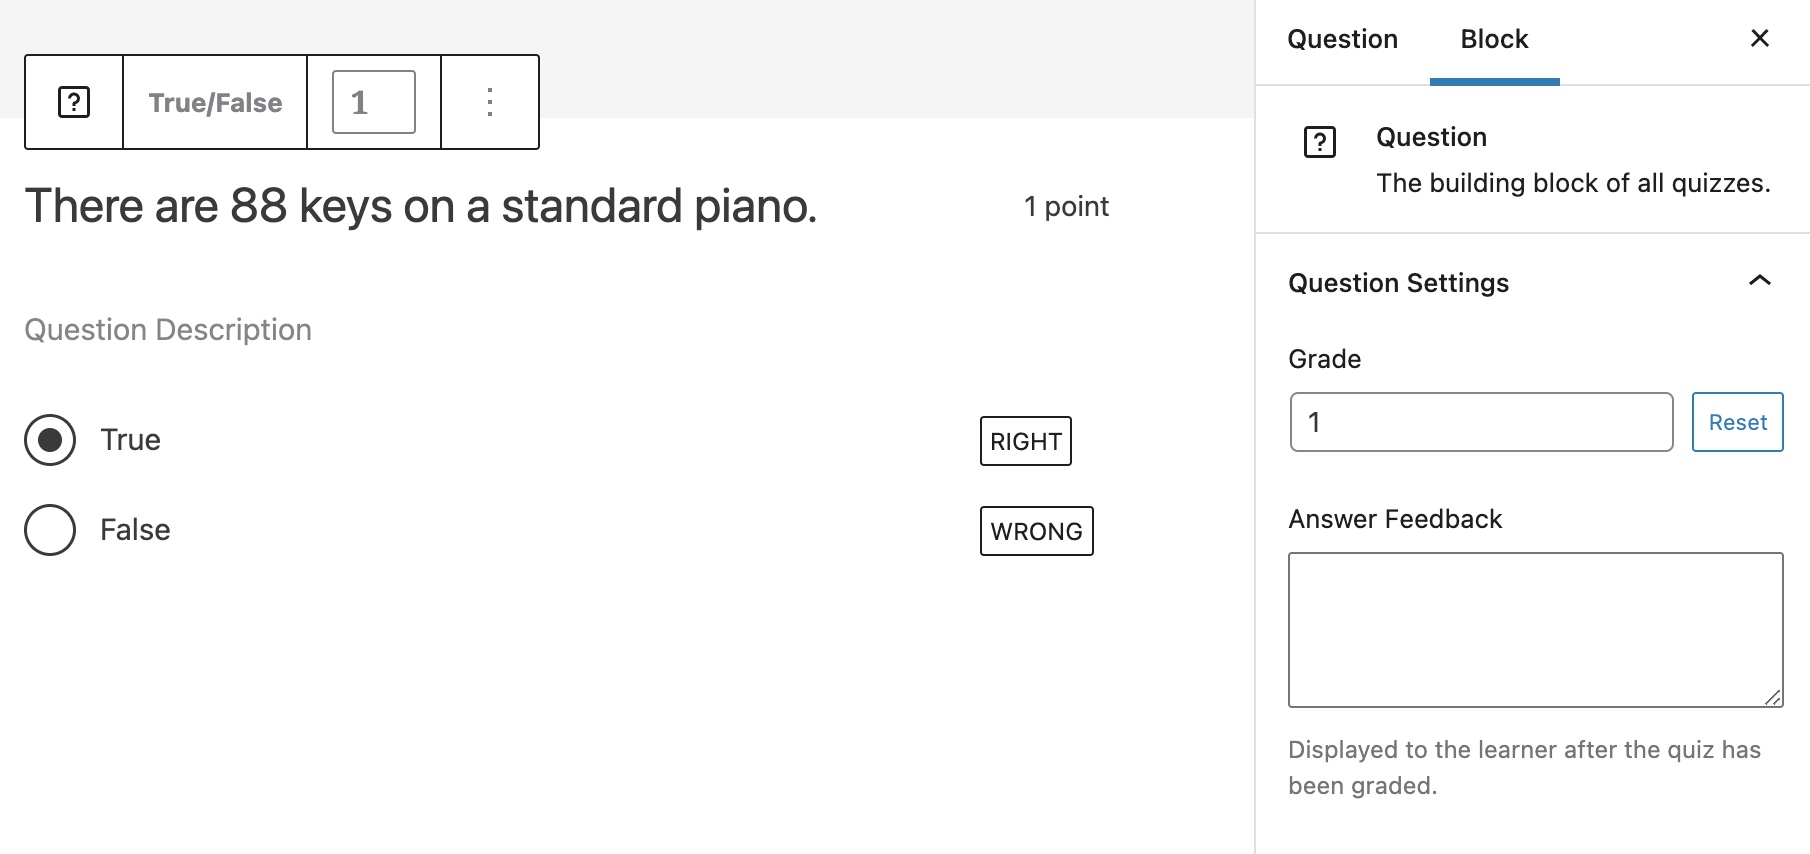
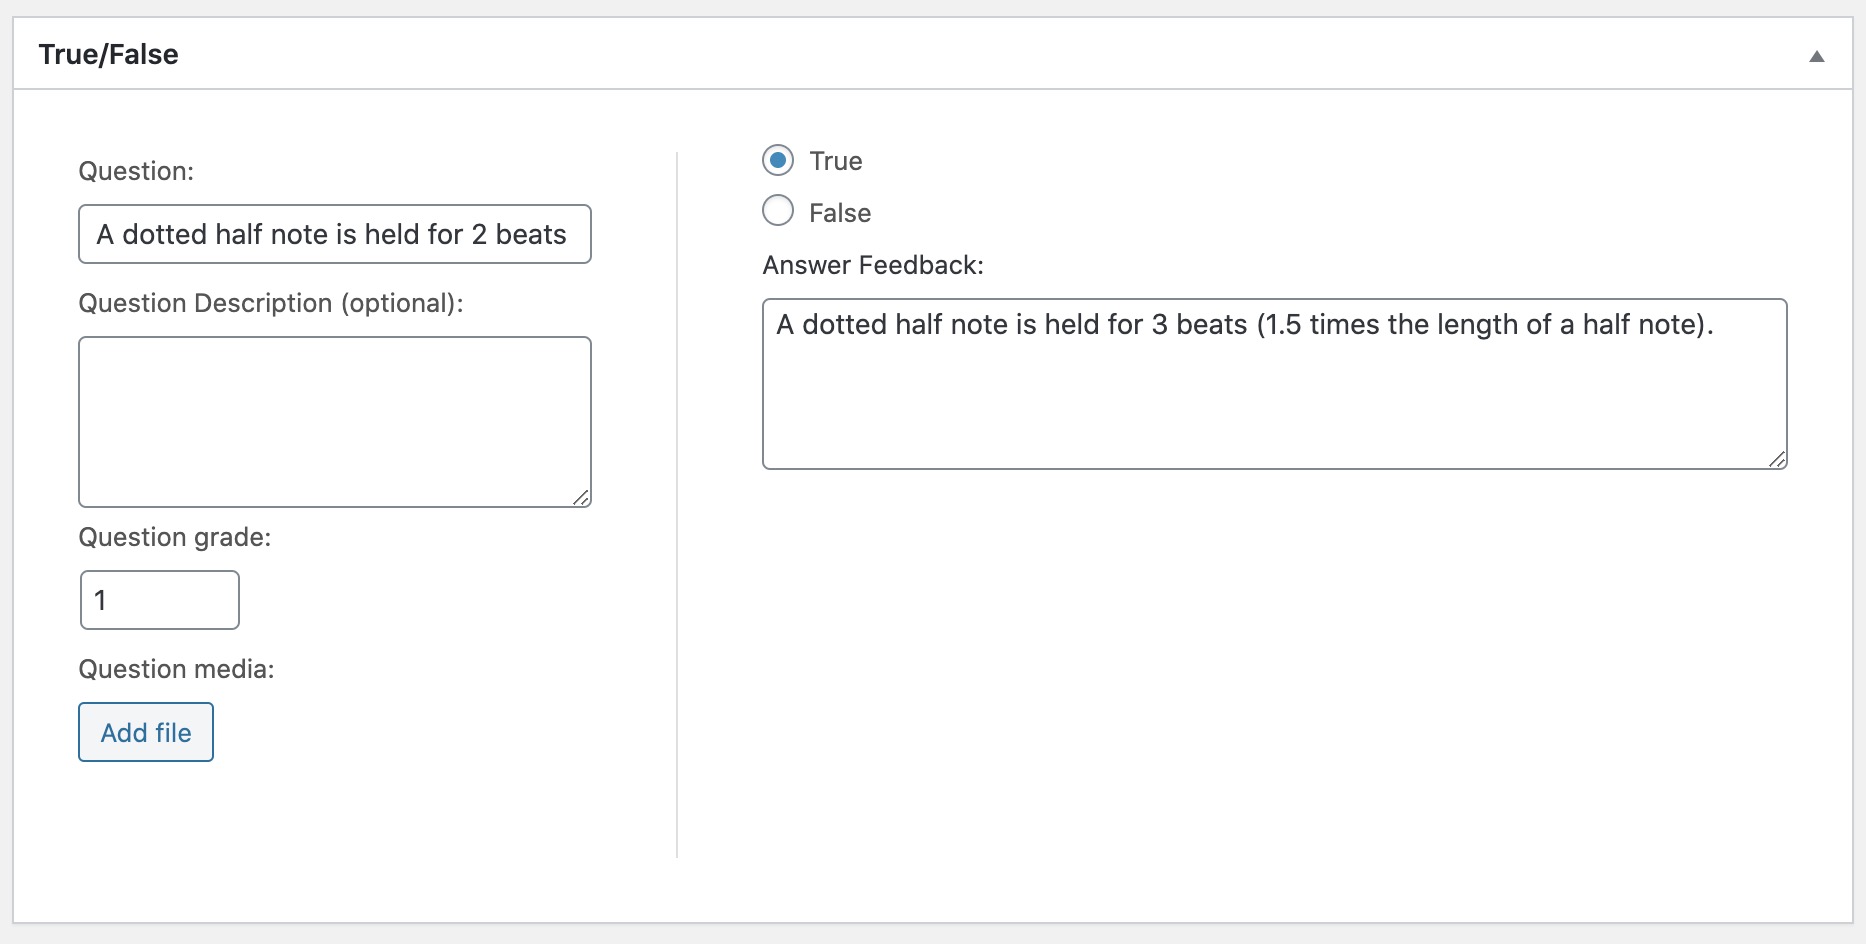
True/False
True/False questions are the simplest question type and take either a true or false answer. The correct answer can be set by clicking the Right / Wrong toggles next to an answer:
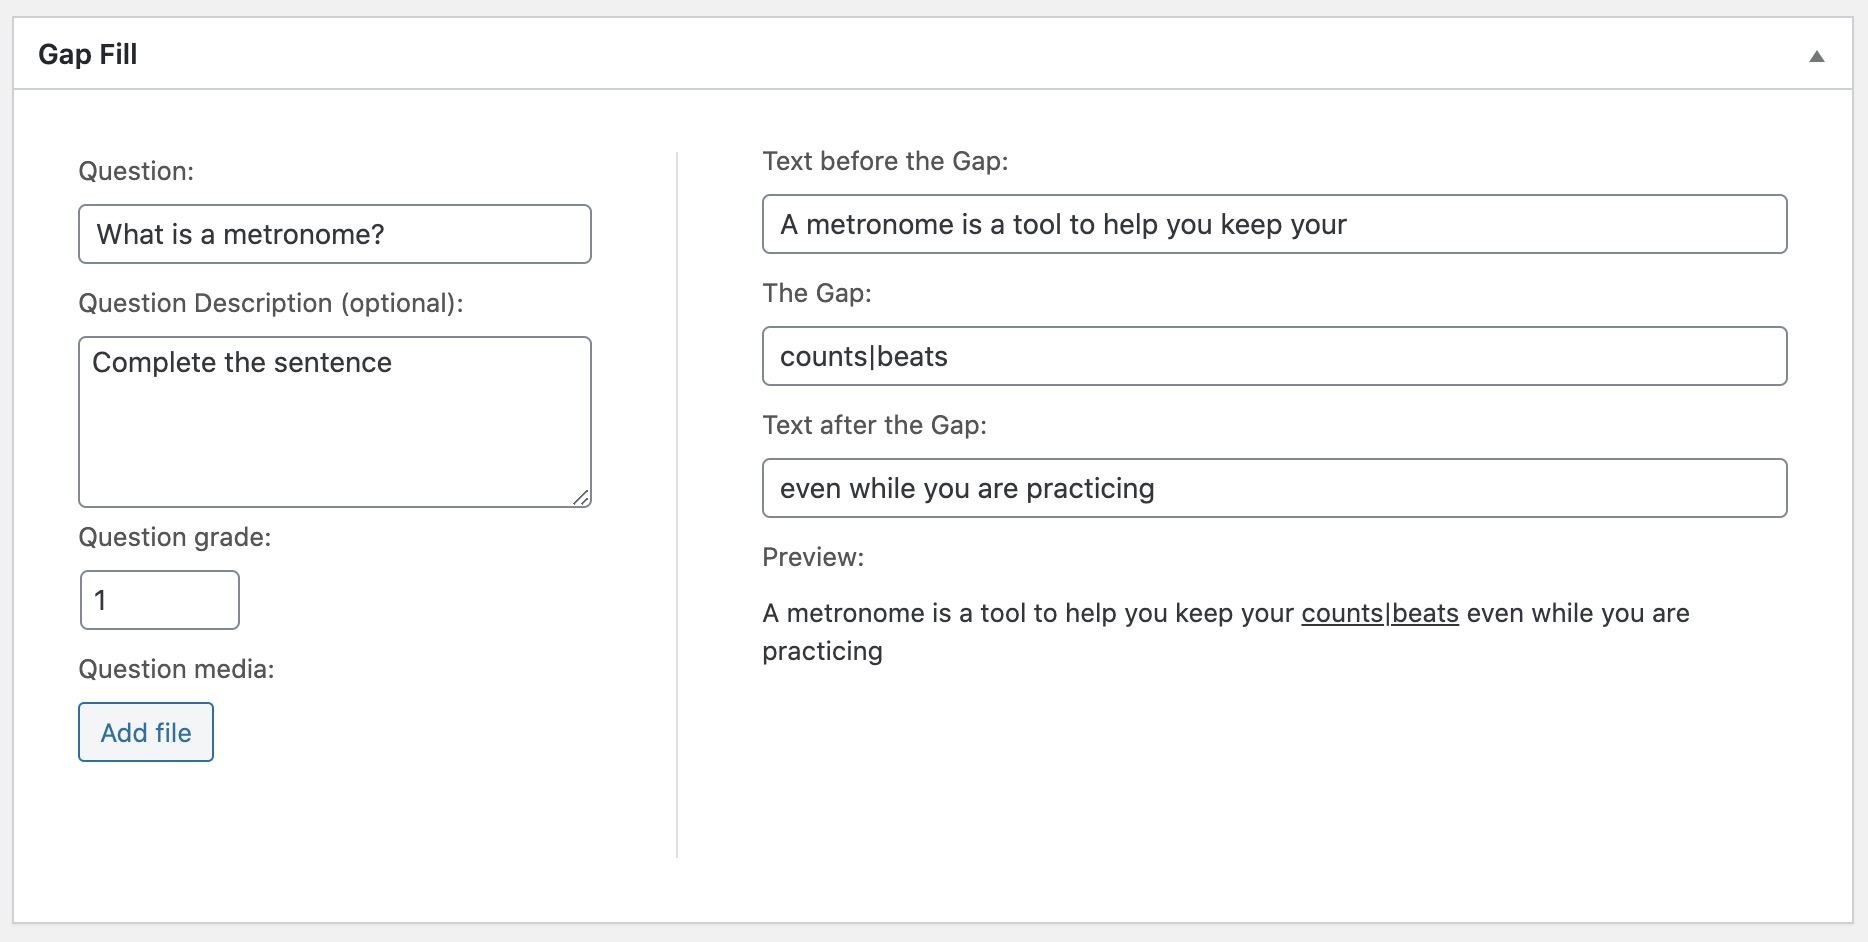
Gap Fill
Gap fill requires a learner to fill in the blank, where the “gap” represents the acceptable answers. Multiple correct answers can be specified by typing a comma or pressing the Enter key after entering an answer:

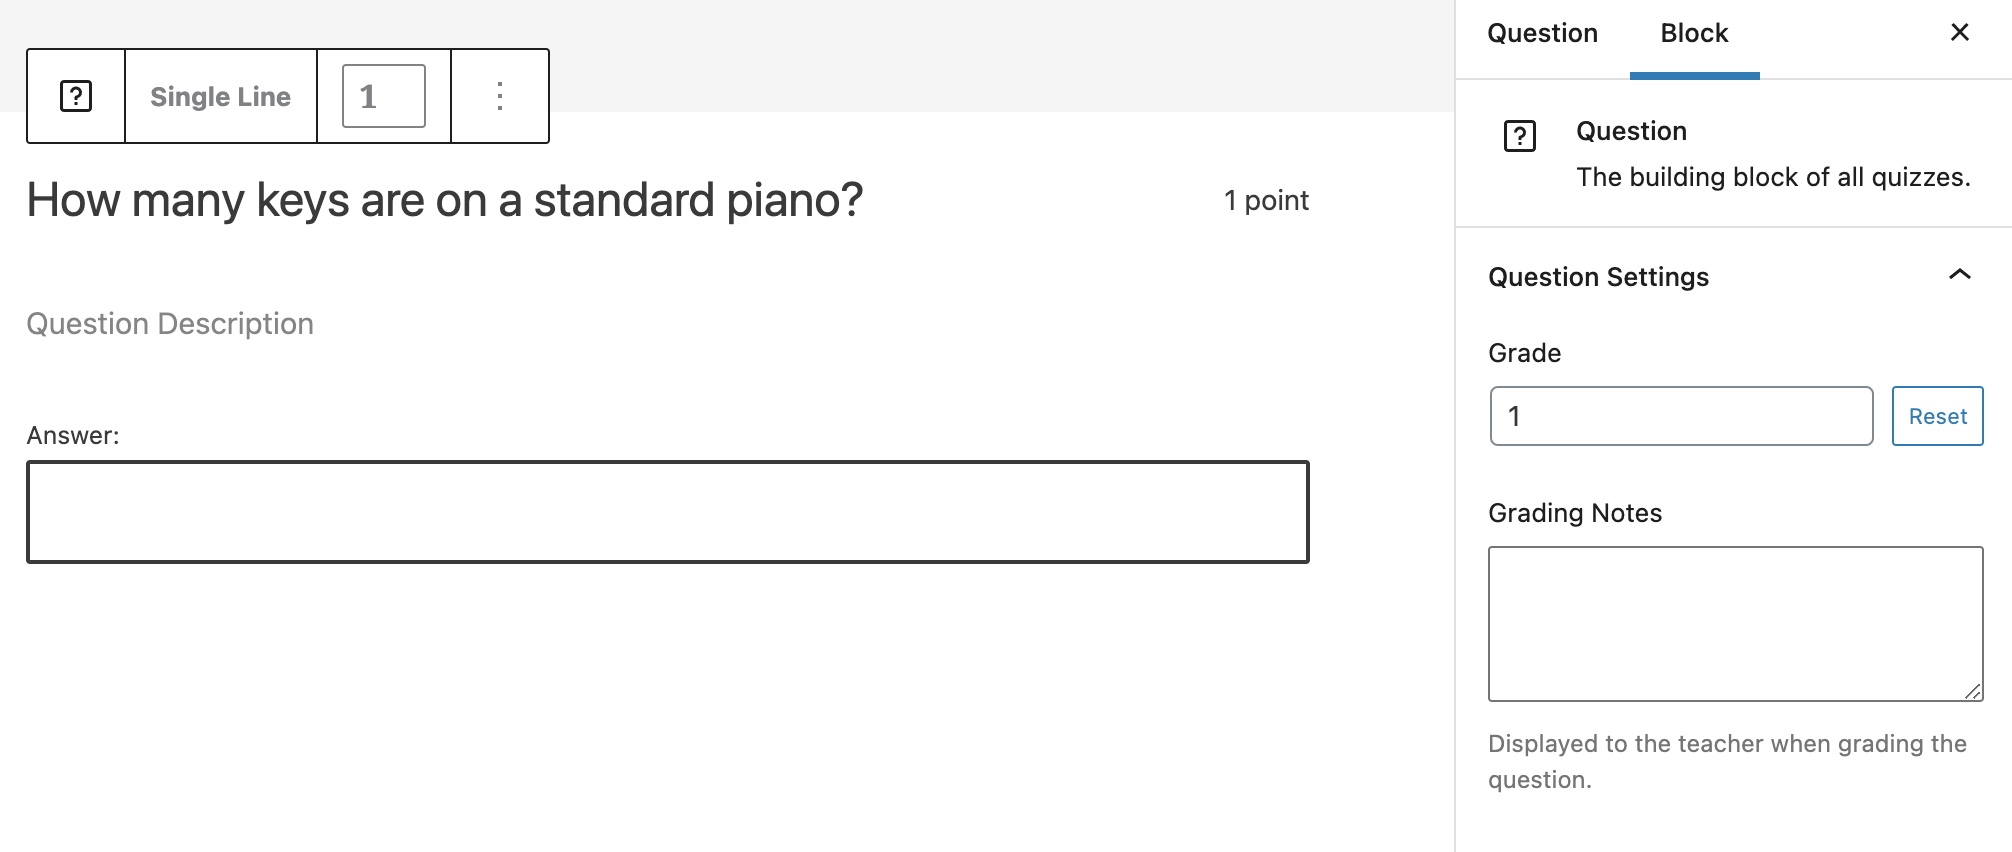
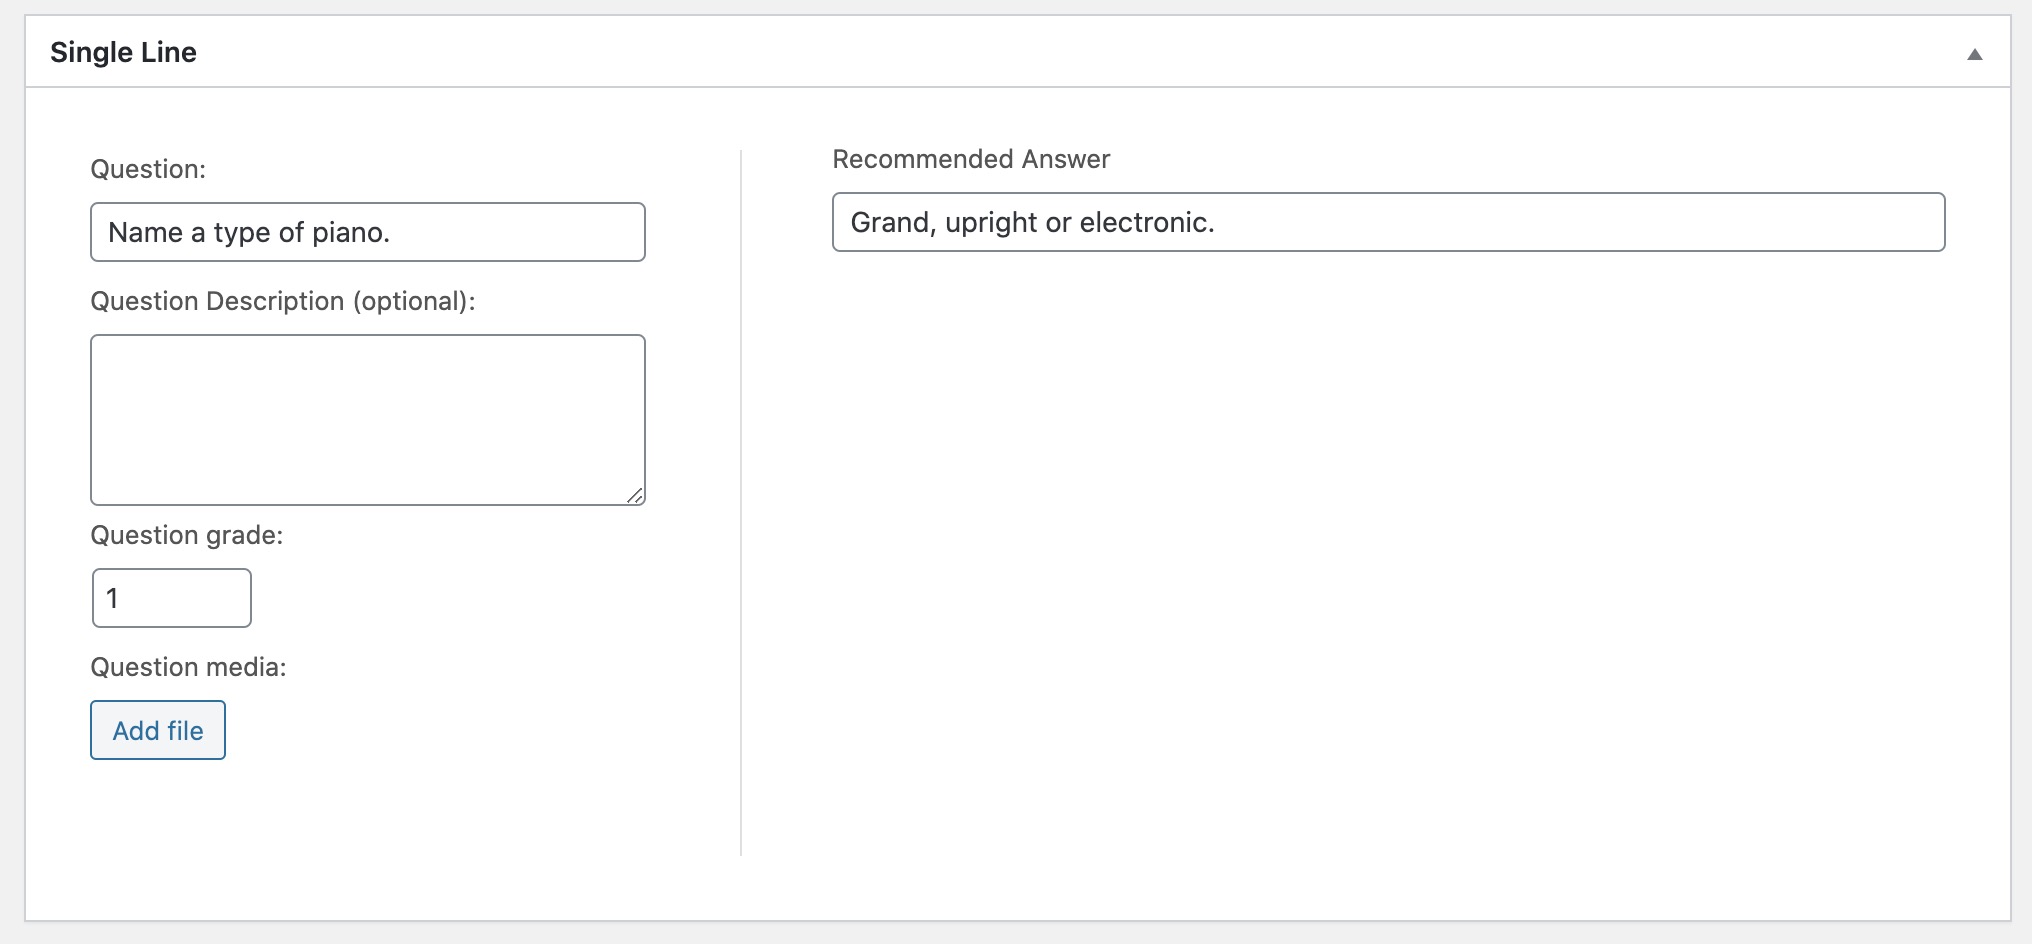
Single Line
Single line questions enable learners to enter their answer into a single line text field:
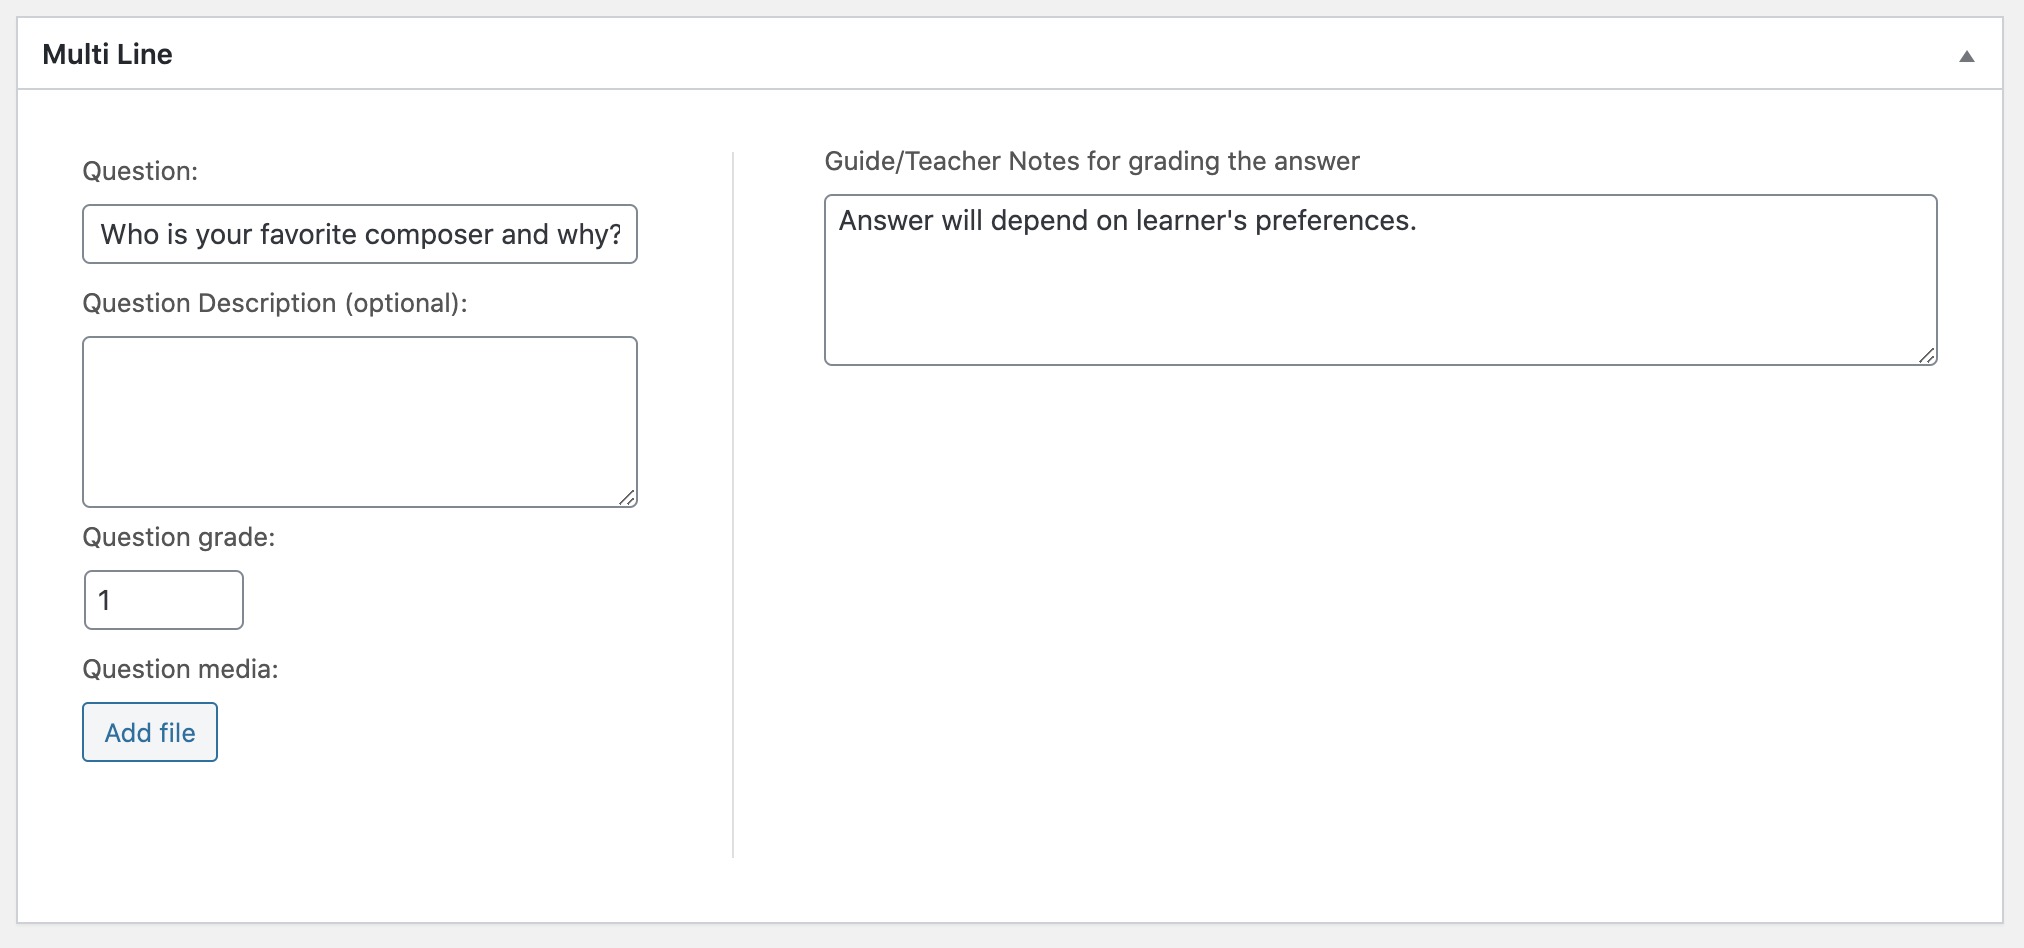
Multi Line
Multi line questions are open-ended questions that enable learners to enter their answer into a multi-line text field:

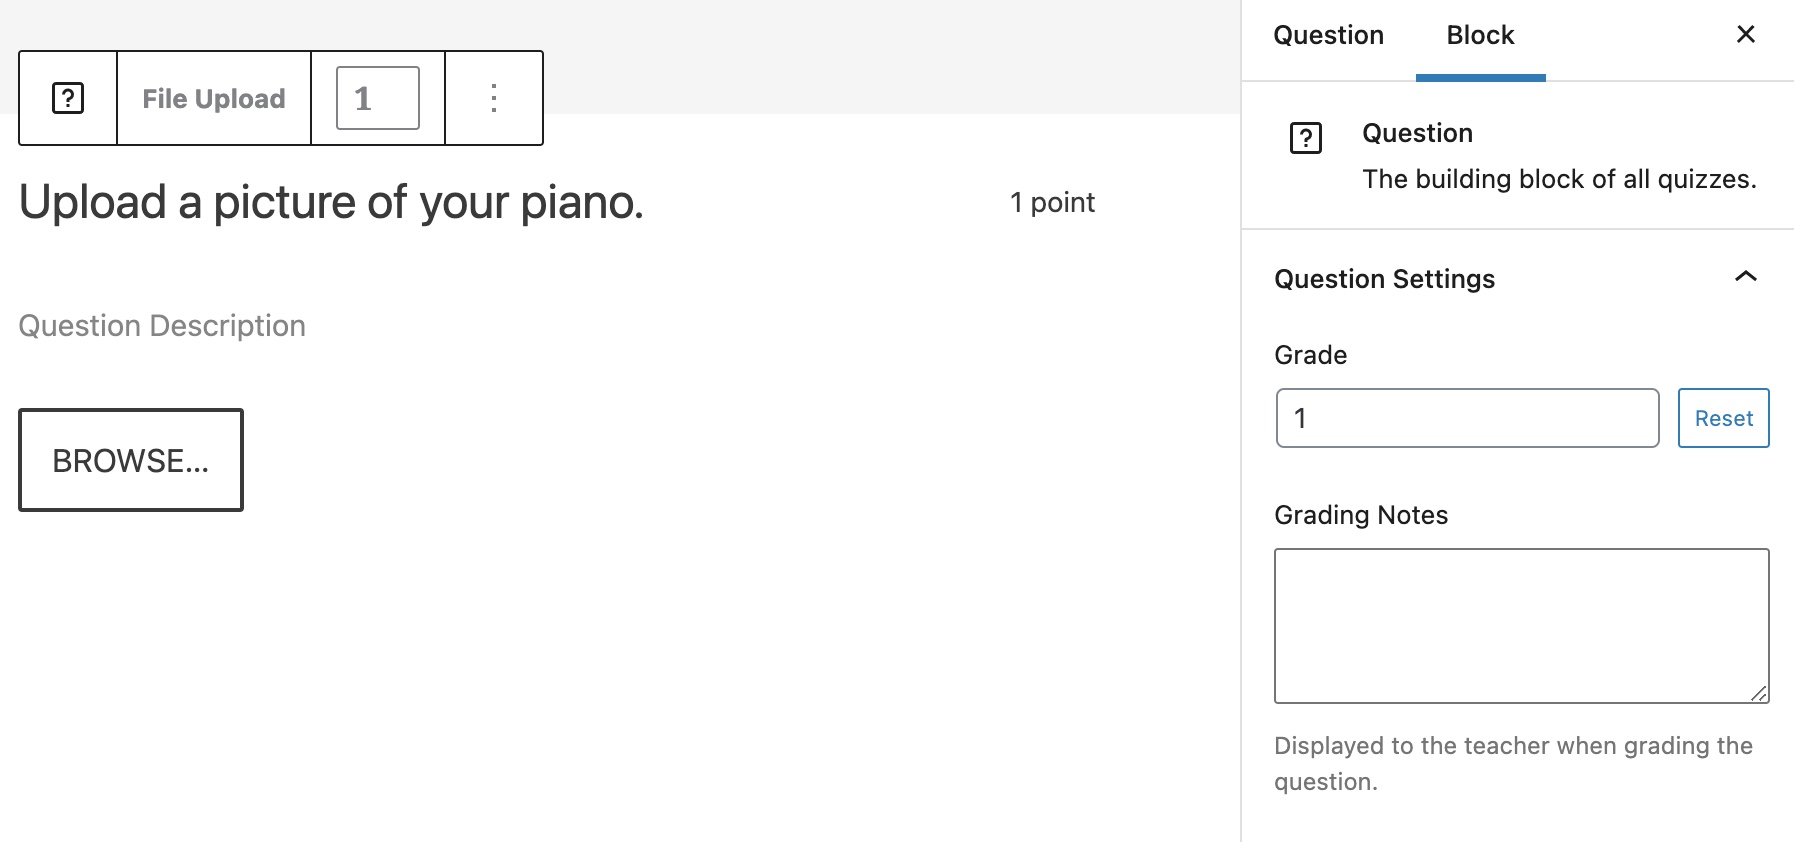
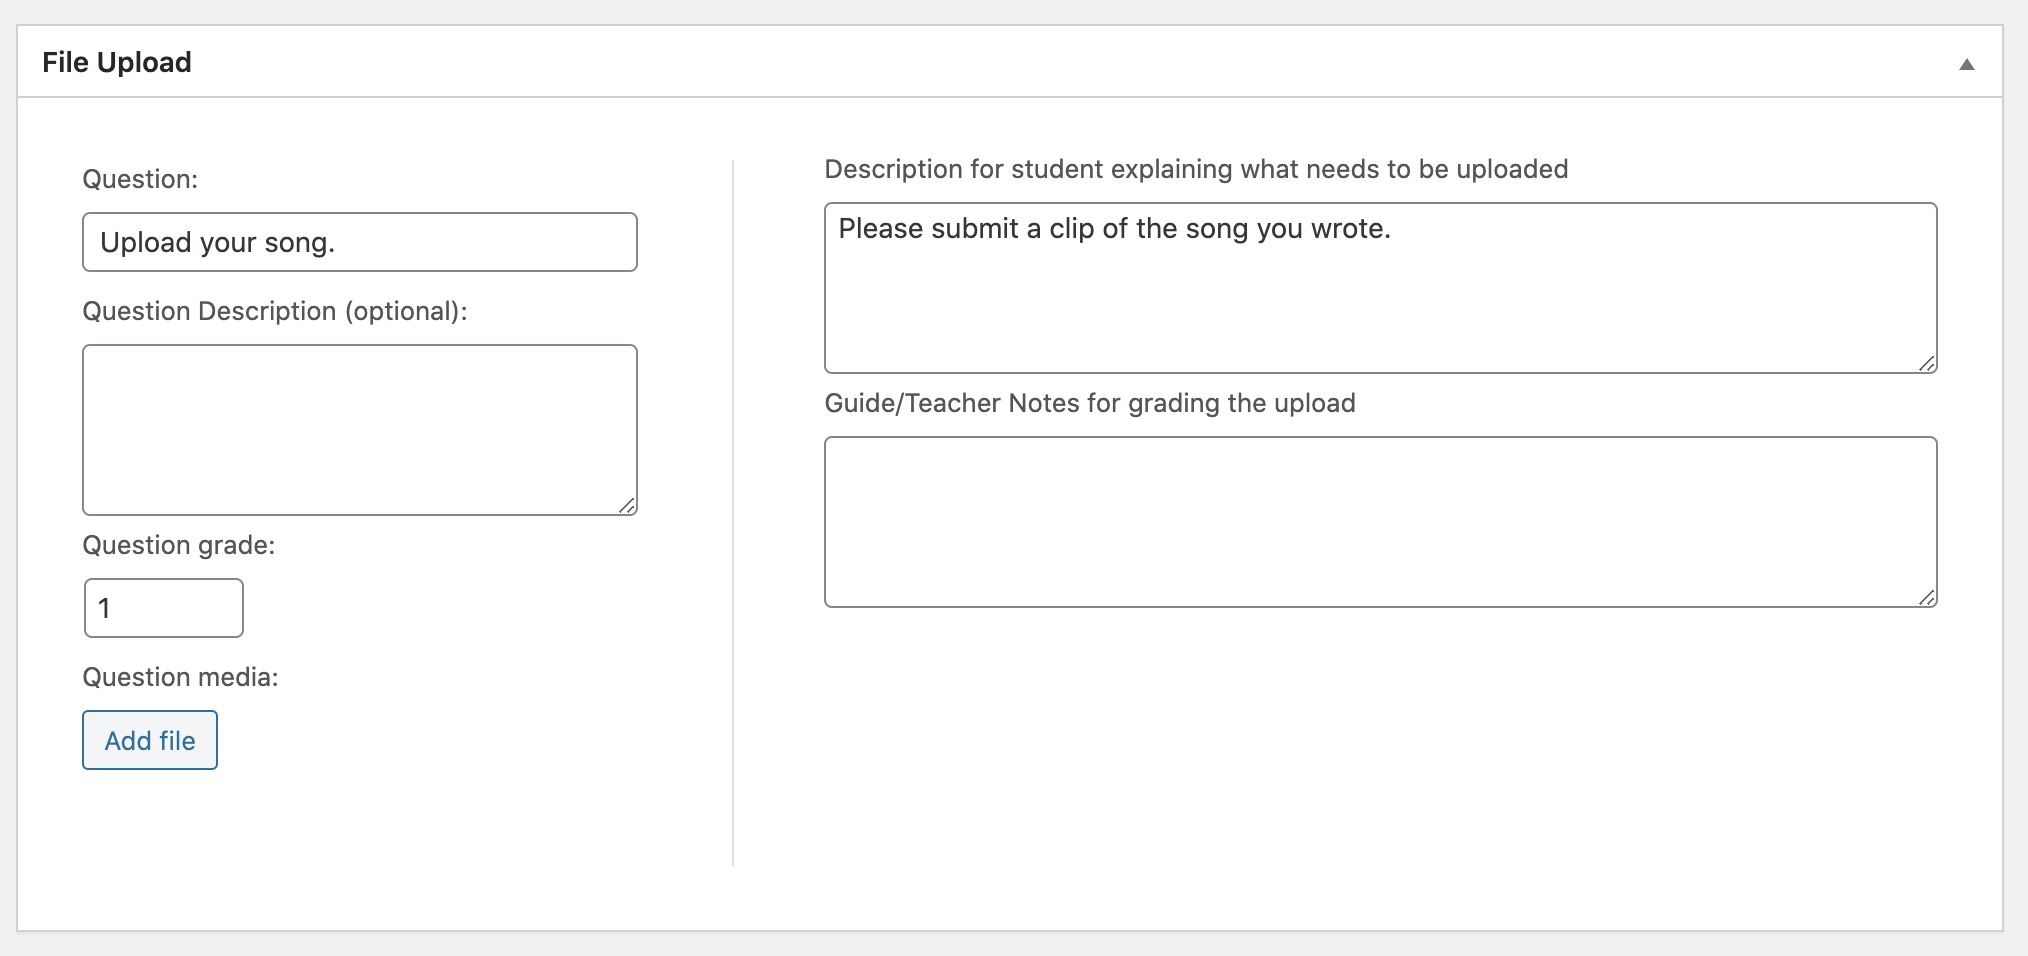
File Upload
The file upload question type enables your learners to upload a file or document as their answer. Supported file types are controlled by WordPress. Examples include images, documents, audio and video files:
Settings
Each question type has individual settings that can be configured. Some of these settings are common to several types:
- Grade – All question types have a grade setting that configures the number of points to assign to a question. For example, you could assign a higher point value to more difficult questions, while easier ones would have a lower value. The grade can be set from either the toolbar or the sidebar by typing a new value, or clicking the up and down arrows.
- Answer Feedback – Answer feedback is only applicable for multiple choice, true/false and gap fill questions. This feedback is shown to learners after they submit a quiz that is graded automatically. For manual grading, the answer feedback can be customized when the quiz is graded.
- Grading Notes – Grading notes are only applicable for single line, multi line and file upload questions. They are displayed to the teacher when grading the question to provide some guidance on the expected answer.
Question Management – Legacy*
*This section is only applicable for those who are still using the legacy meta boxes, rather than blocks, to manage questions.
Questions can be added independently of a quiz, making it possible to use them across multiple quizzes. To add a question:
- Go to Questions > Add New.
- Enter the question in the Question field.
- Enter an optional Description.
- Select a type from the Question Type dropdown.
- Update the Grade. This should be a number greater than or equal to 0.
- Enter the answer to the question. The exact format will depend on the type of question that was selected.
Question Types
There are a number of different question types to choose from:
- Multiple Choice
- True/False
- Gap Fill
- Single Line
- Multi Line
- File Upload
Multiple Choice
Multiple choice questions support multiple right and wrong answers. If a question has more than one correct answer, the learner must select all of them in order to pass (if a passmark is required).
Selecting Randomise answer order will display the options in a different order every time the quiz is viewed:
True/False
True/false questions are the simplest question type and take either a true or false answer:
Gap Fill
Gap fill is a fill-in-the-blank question type, where the “gap” is the blank that needs to be filled in by the learner. If there is more than one possible answer, or you want to account for common spelling mistakes, you can add the answer as a regular expression. The most common use of this would be to list all possible correct answers, with each one separated by a | symbol:
When a gap-fill question is auto-graded, the case and leading/trailing spaces are ignored. In the example above, both ” Counts” and “Beats ” are acceptable answers.
Single Line
Single line questions allow learners to enter their answer into a text box that is restricted to a single line of text:
Multi Line
Multi line questions are open-ended questions that allow learners to enter their answer into a multi-line text box:
File Upload
The file upload question type allows you to have your learners upload a file or document as their answer. Supported file types are controlled by WordPress, but examples include images, documents, audio and video files:
Settings
Grade
Grade is the value you would like to assign to the question. For example, you could give a higher grade to more difficult questions, while easier ones would have a lower score.
Questions can also be assigned a grade of 0. Questions with a zero grade are skipped during auto-grading.
Media
A media file can be included as part of a question. Images, audio and video files are displayed inline within the question. All other types of media are displayed as links. Additionally, the title and description of the media item, if specified, are displayed below the media. By default, images use the Medium size width and height settings as defined in Settings > Media.
Answer Feedback
Answer feedback is applicable for multiple choice and true/false questions. This feedback is shown to learners after they submit a quiz that is set to grade automatically. For manual grading, the answer feedback can be customized when the quiz is graded.
Question Categories
Question categories make it easier to find relevant questions to add to a quiz. A category can be added to a question by selecting one or more categories in the Question Categories panel. A new category can be added by clicking the + Add New Question Category link.
Question categories can be managed by going to Questions > Categories.
Sensei LMS enables teachers to manually grade a lesson. To access this area, go to Sensei LMS > Grading.
By default, the Grading page lists all of the ungraded quizzes that have been submitted for manual grading. The following columns are displayed:
- Learner – Name of the learner
- Course – Name of the course
- Lesson – Name of the lesson
- Updated – Date and time the learner last viewed or interacted with the quiz
- Status – Grading status (Ungraded, Graded, In Progress)
- Grade – Learner’s grade for the quiz or N/A if not yet graded
- Button for grading the quiz or reviewing an existing grade

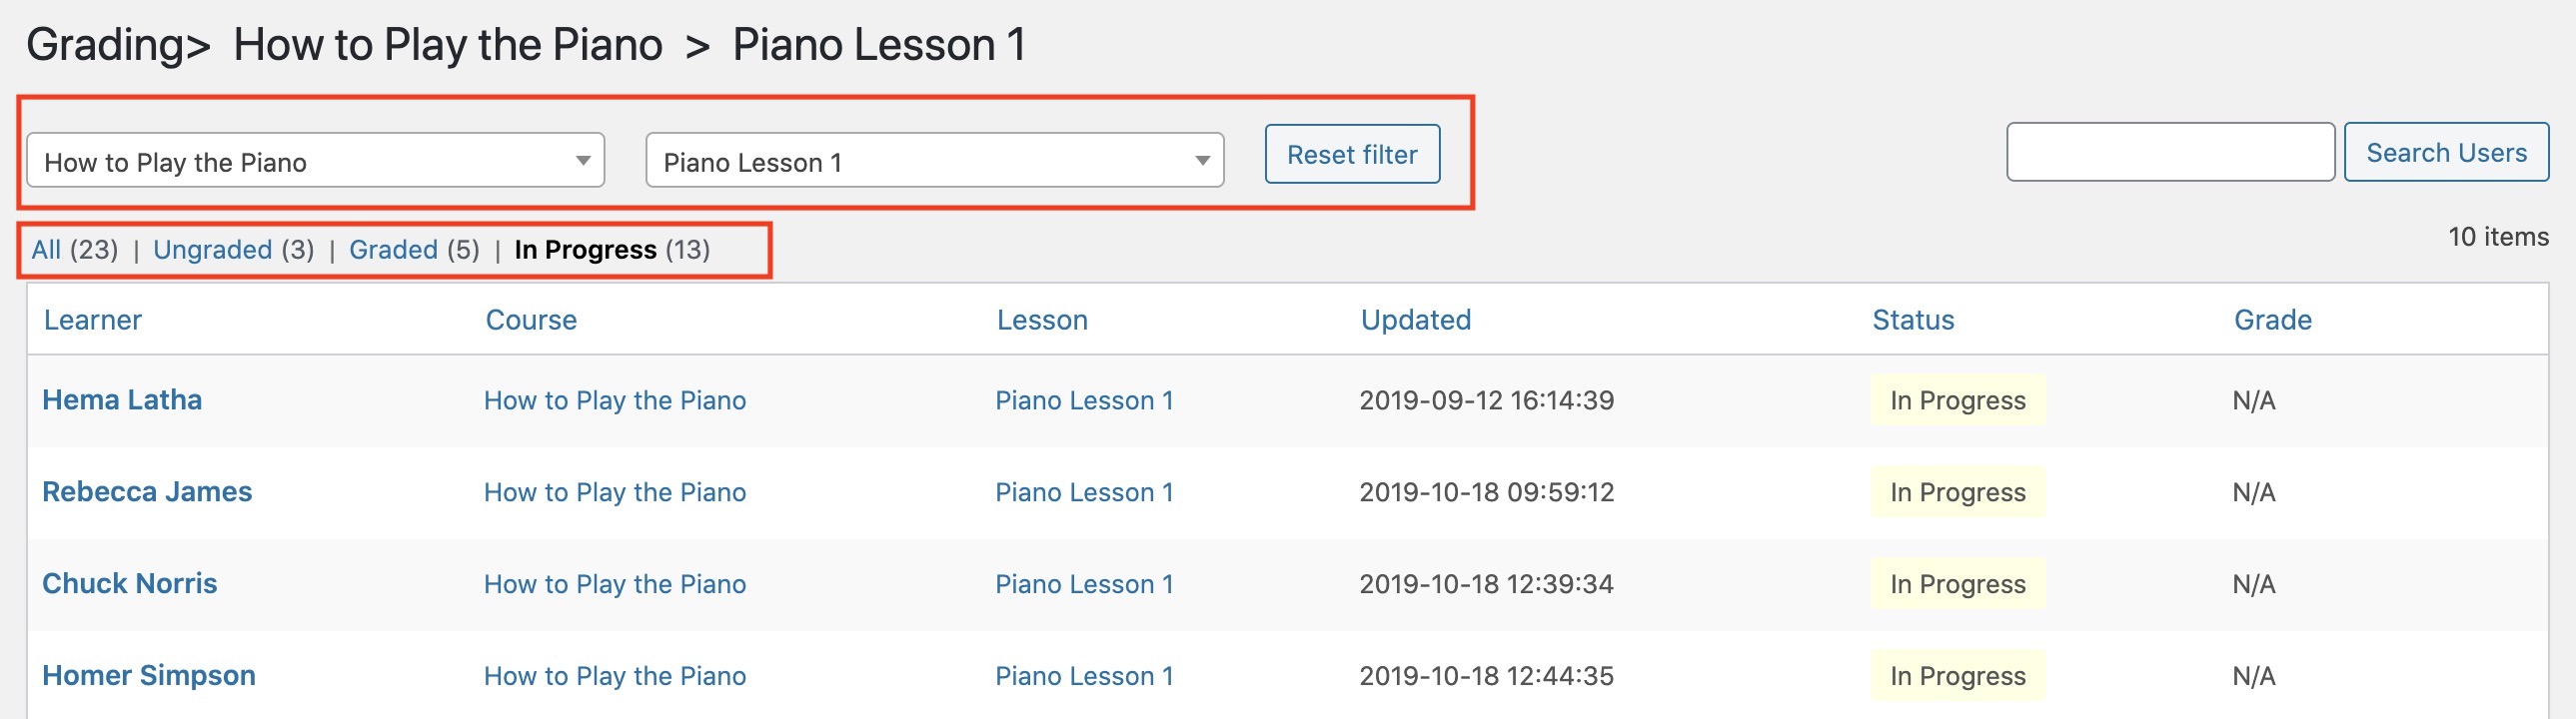
Filter the Quizzes
The table can be filtered to only show quizzes for a particular lesson by selecting a course and then a lesson from the drop-downs. To remove lesson filtering, click the Reset filter button.
The view can also be changed such that all quizzes are displayed, or only those that are ungraded, graded, or in progress:
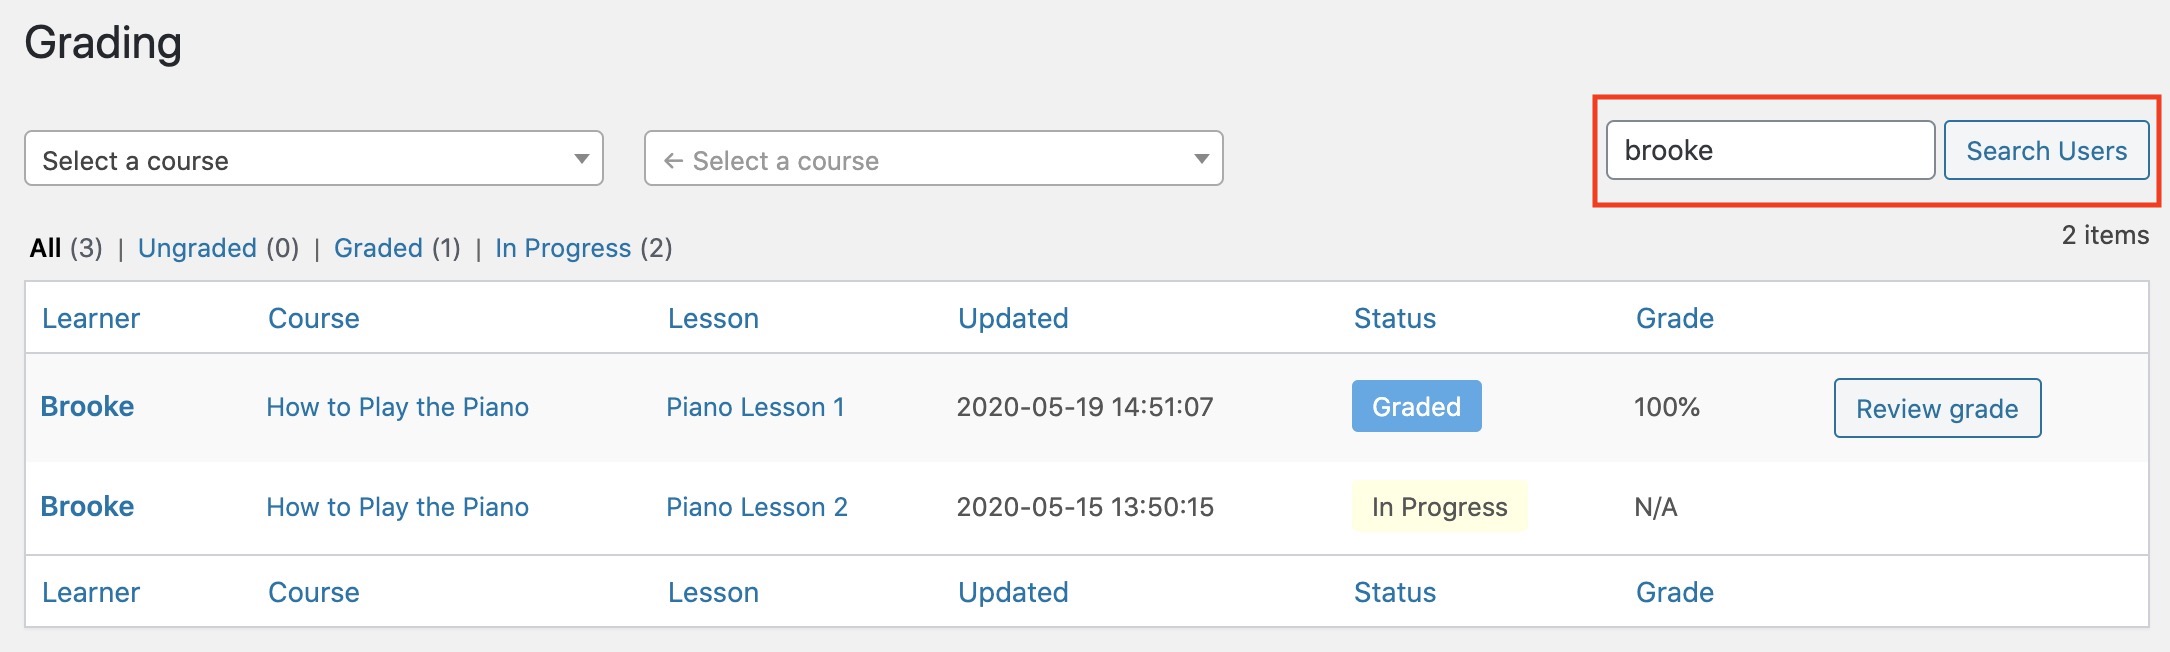
To show quizzes for a specific learner, enter the learner into the search box and click the Search Users button. To display all learners again, clear the search box and submit an empty search:
Grade a Quiz
To grade a quiz, locate the quiz in the table and click the Grade quiz button. If the quiz has already been graded, the button will be named Review grade instead:
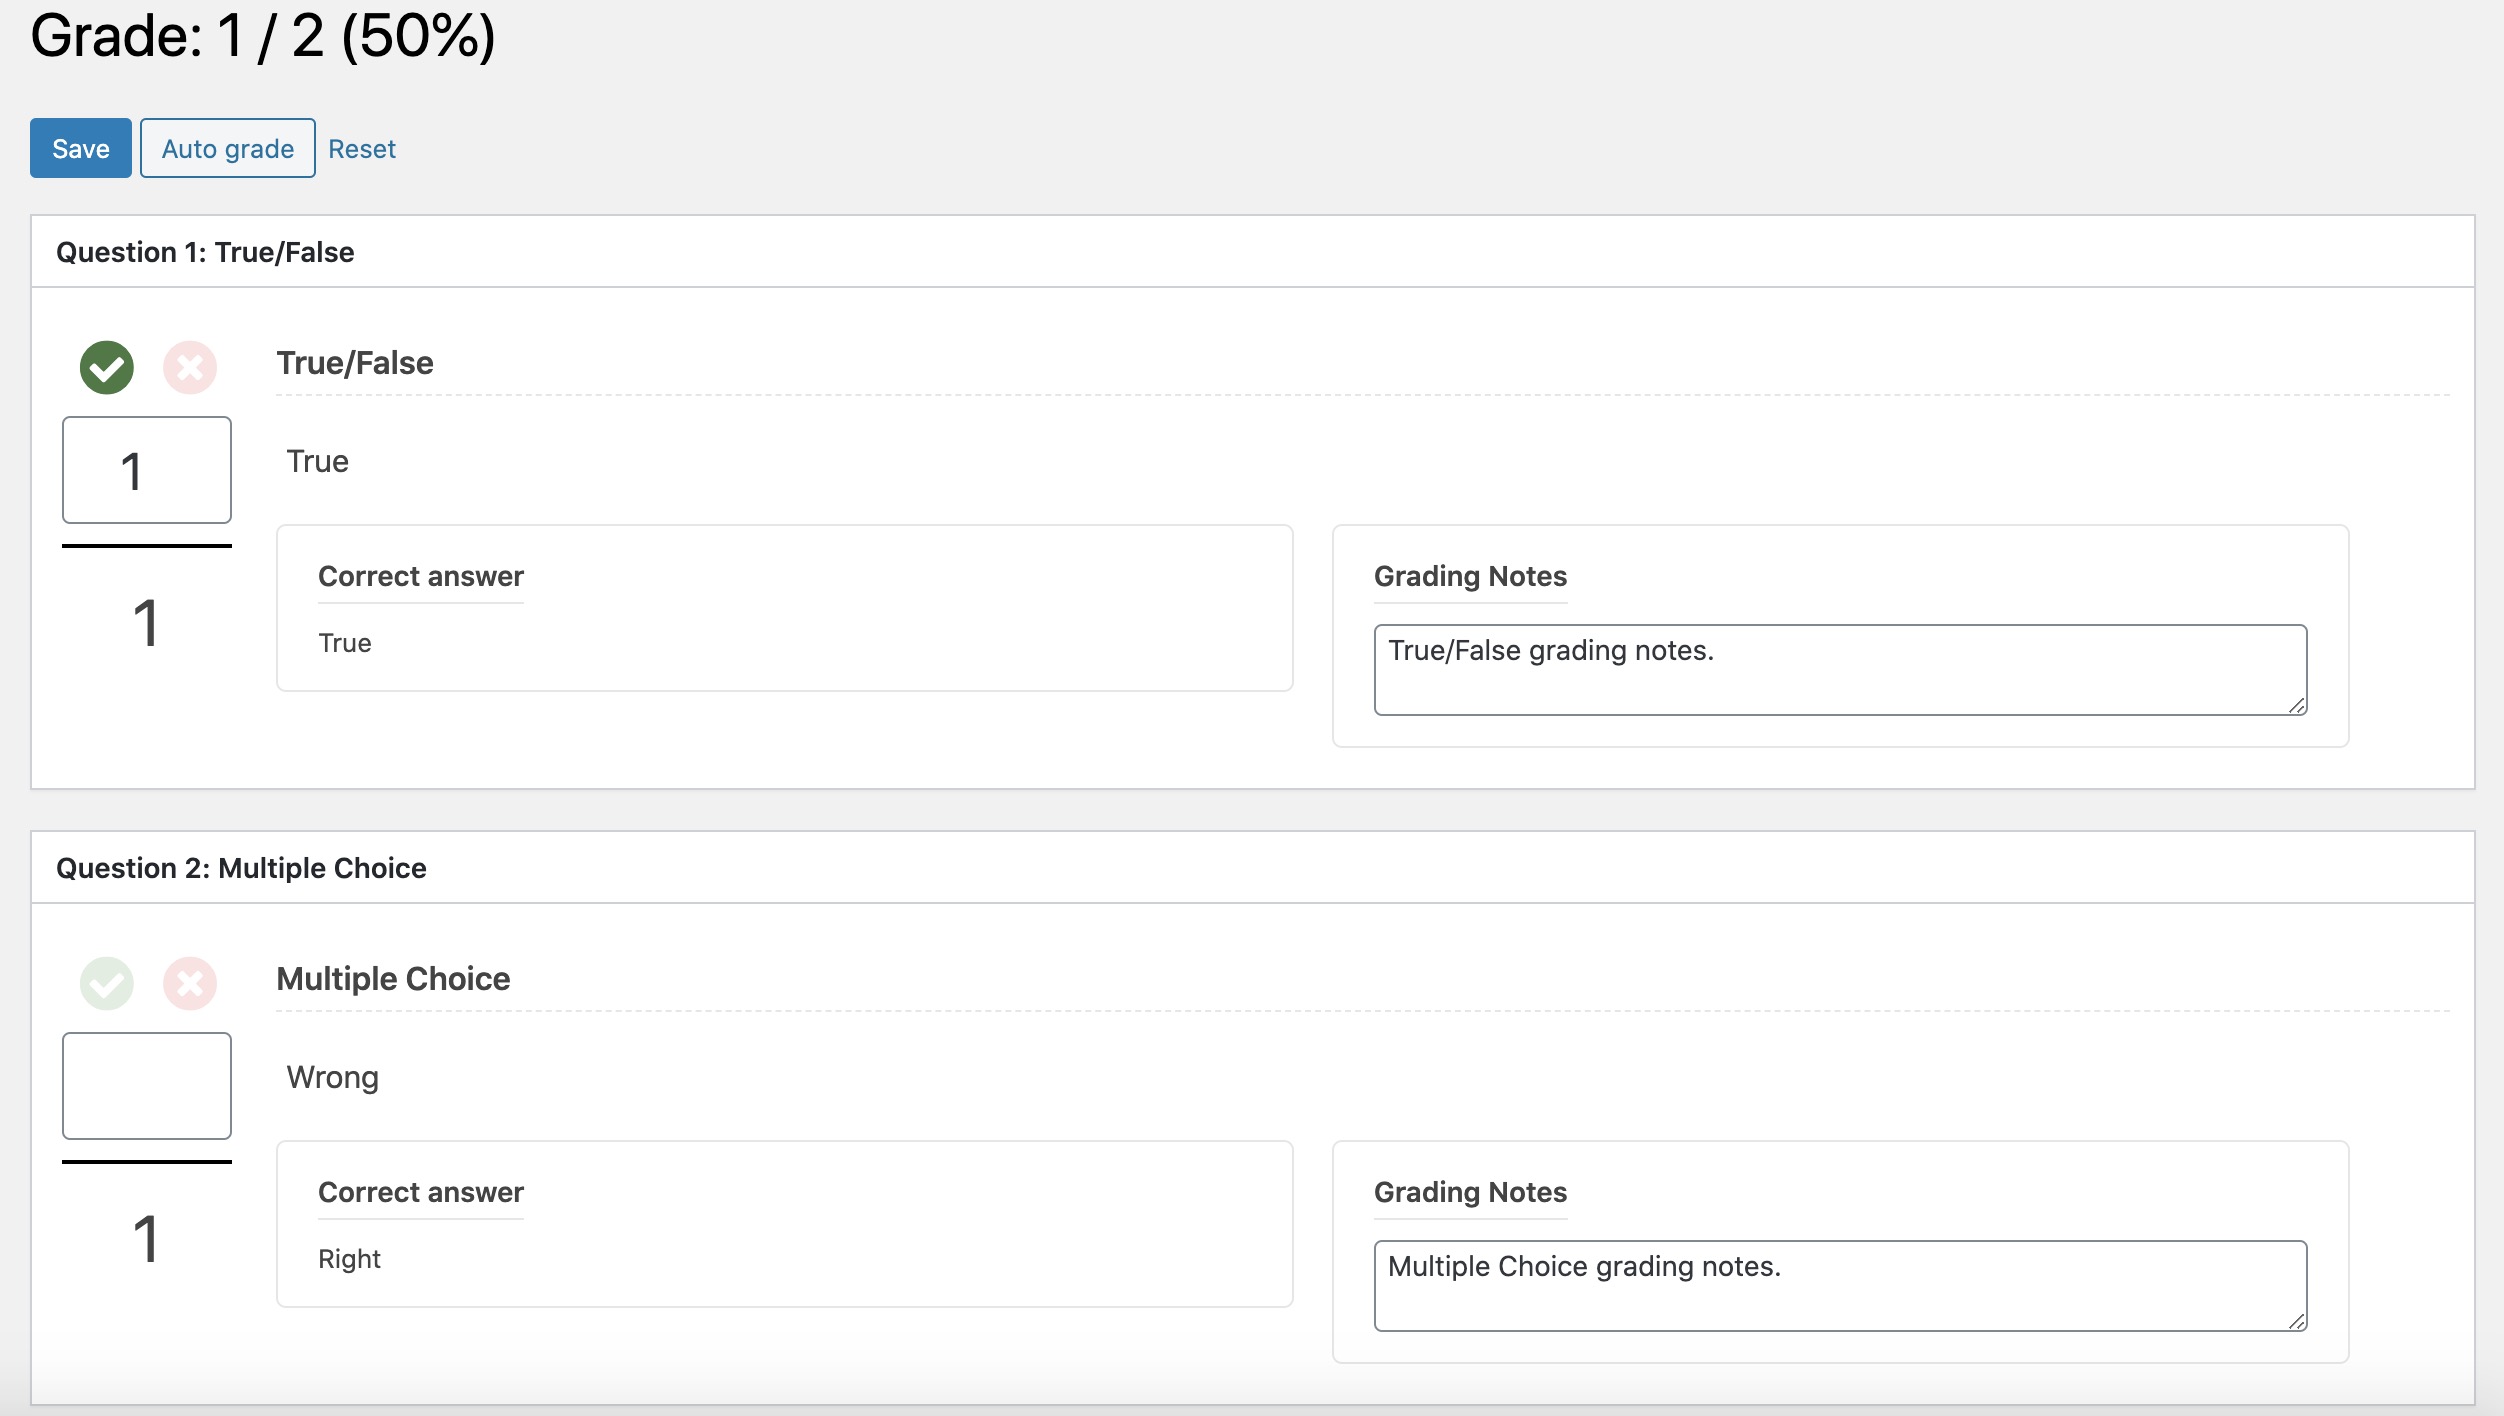
Any questions that were auto-graded at the time the quiz was submitted will already be marked. The remaining questions can be manually graded by clicking the checkmark or X icons.
For each question, you can also:
- Add grading notes. Use these to provide feedback to learners about their answer.
- Assign a specific grade to an answer. This value must not exceed the question’s original grade.
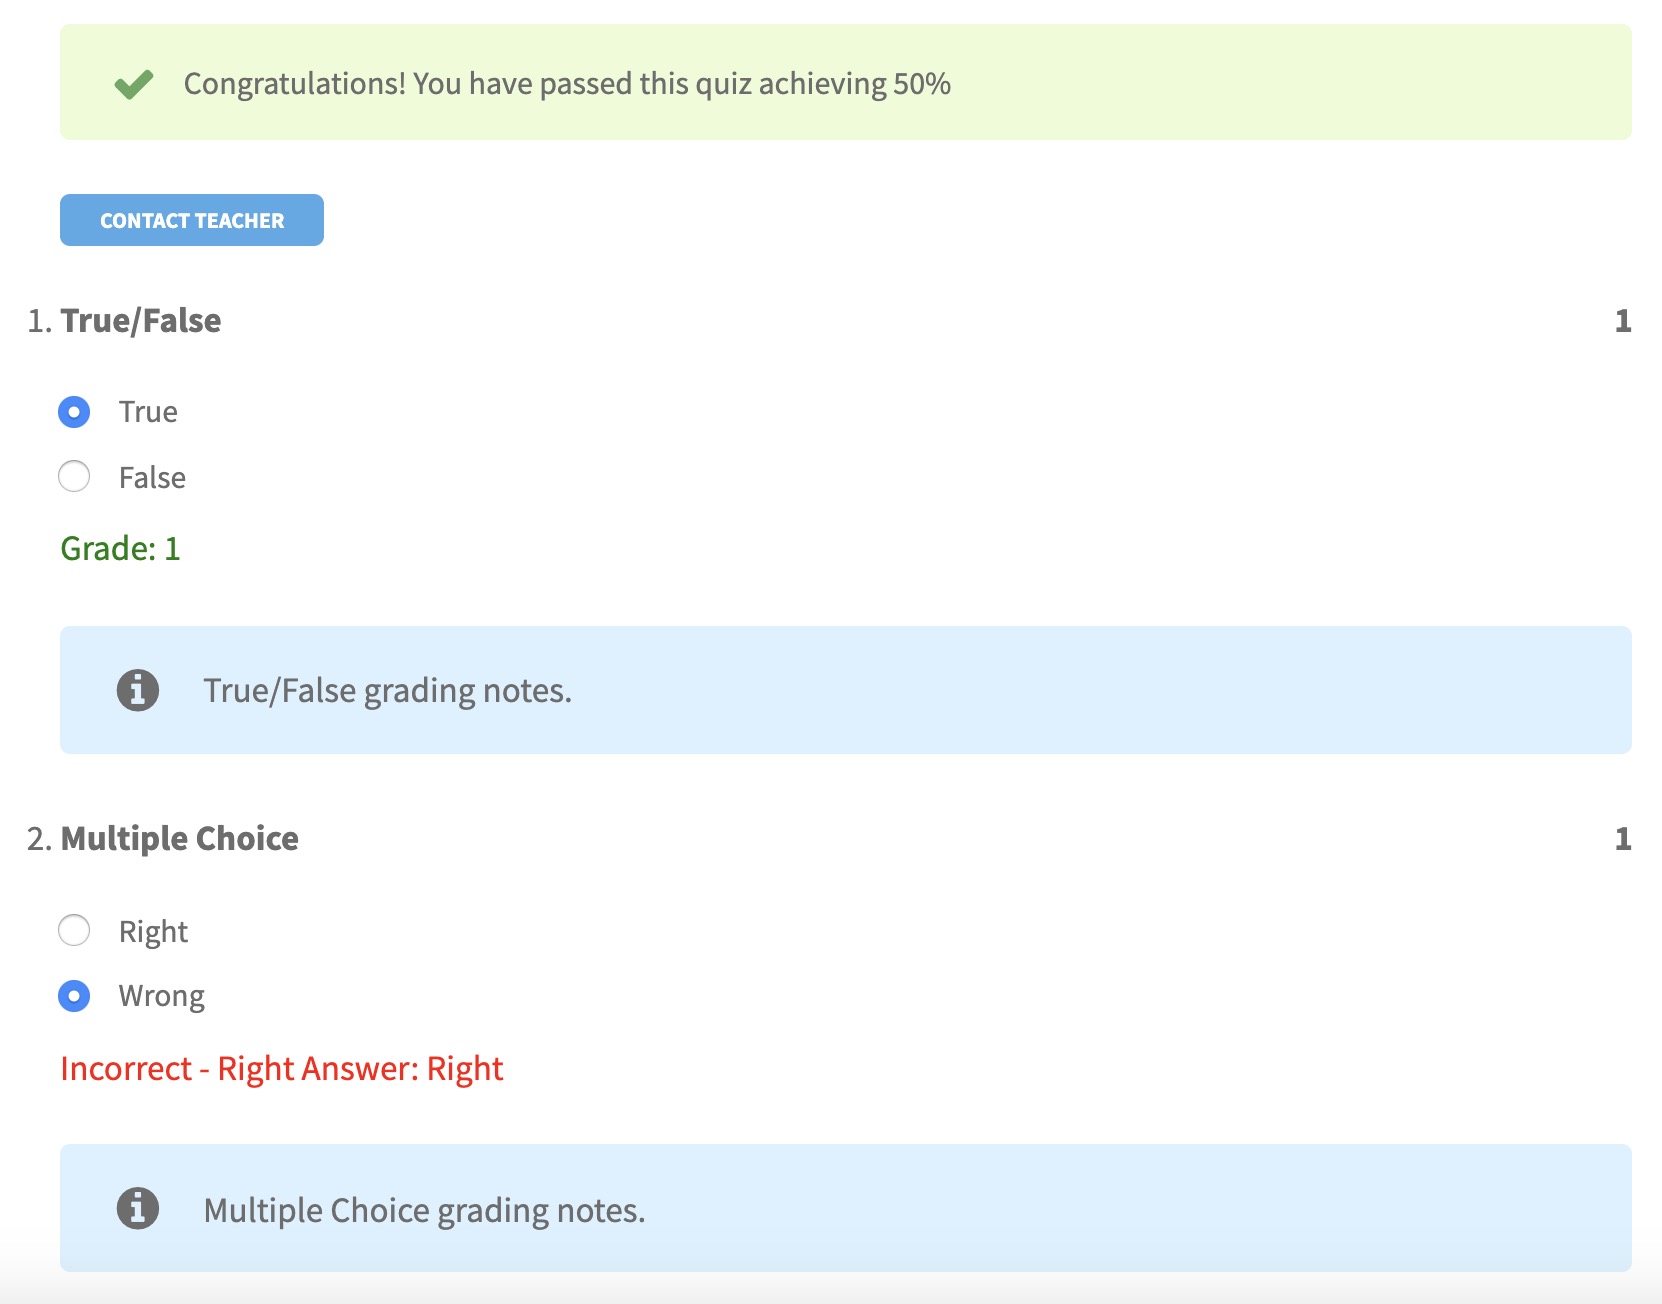
When a learner views their graded quiz, they will see which questions they got right, as well as their grade for each question and their total grade for the entire quiz. They will also be able to see any grading notes that were entered by the teacher:
Quizzes are associated with an individual lesson. That means that in order to add a quiz, you will need to create a lesson first. To do that, go to Lessons > Add New. You will see that the Quiz block has already been added at the bottom of the lesson. (Note: For managing quizzes using the legacy meta boxes, please refer to this documentation.)

From here, you can choose to either add a new question or an existing question.
New Question
Please see the Questions documentation for information on how to add new questions. It’s worth noting that when a new question is added to a quiz, that question is also added to the question bank so that it can be used again in other quizzes.
Existing Question(s)
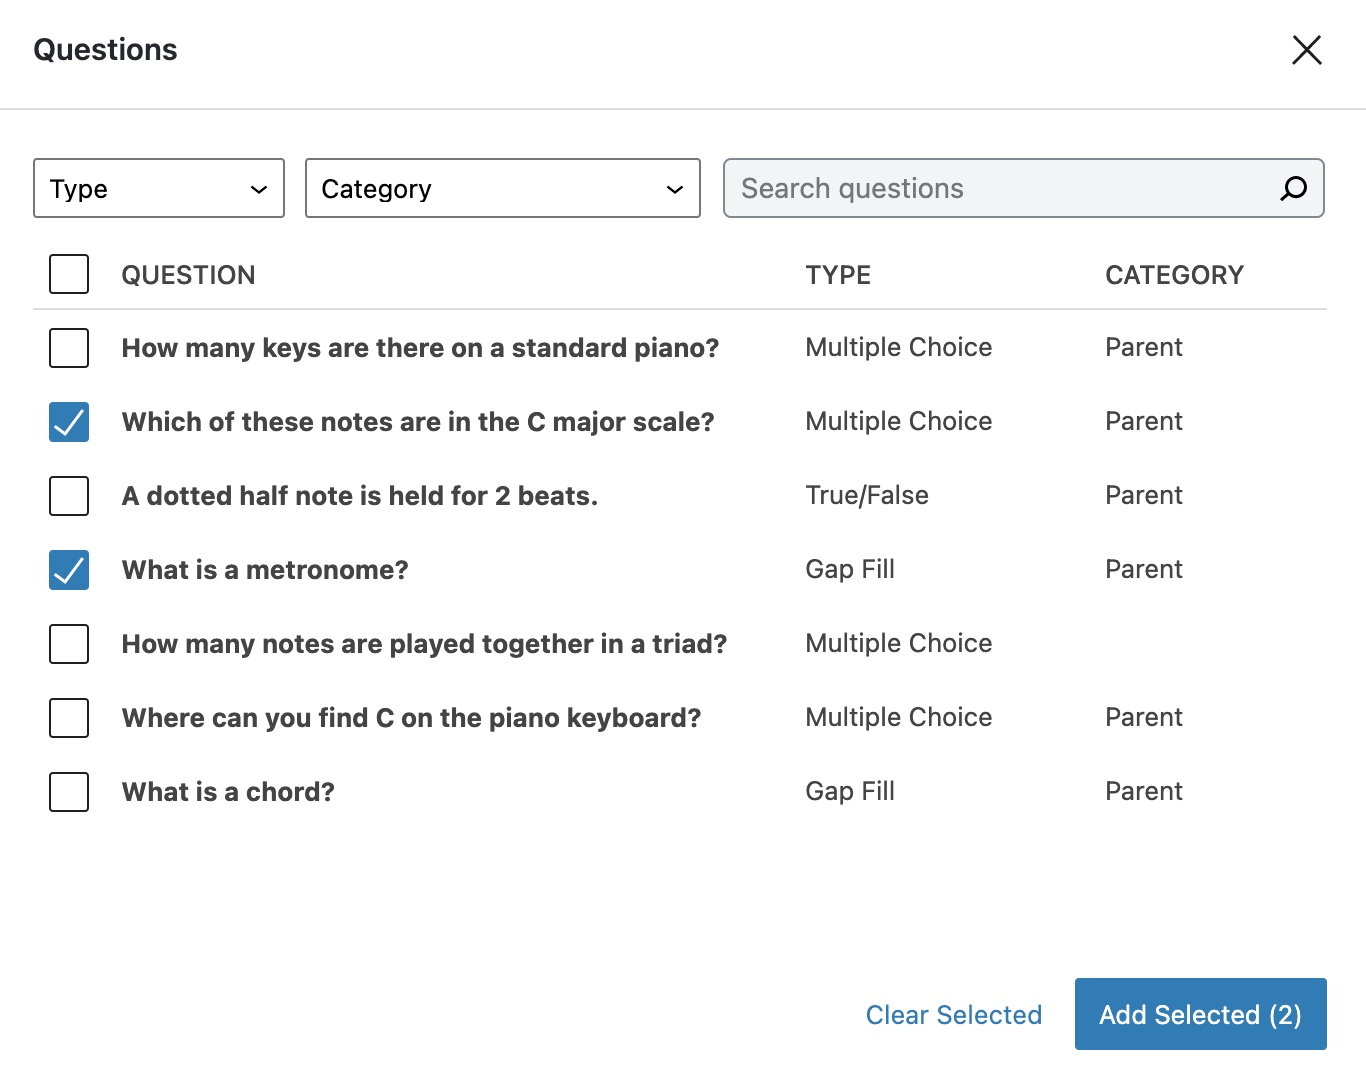
You can also select one or more existing questions from the question bank to add to the quiz. With the quiz block selected, scroll to the bottom and click the + button that appears above Add new or existing question. Then choose Existing Question(s):

The Questions modal appears that enables you to select multiple questions to add to the quiz. You can filter by question type and category, or search for a question by name. To add a particular question, check the box that appears beside it and then click the Add Selected button. You can select as many questions as you like:
Shared Questions
It’s important to note that if an existing question is used in another quiz, any changes you make to the question in this quiz are also applied to the other quiz. This is denoted by a Shared Question indicator that is displayed when a shared question is selected. Hovering over it shows a tooltip with more information:

Removing Questions
To remove a question from a quiz:
- Click the question to select it.
- In the toolbar, click the More Options icon (the one that looks like three vertical dots).
- Select Remove block.
Please note that removing a question from a quiz does not remove it from the question bank. To delete the question entirely, go to Questions > All Questions, hover over the question, and click the Trash link.
Removing a Quiz
To remove a quiz from a lesson:
- Select the quiz block.
- In the toolbar, click the More Options icon (the one that looks like three vertical dots).
- Select Remove block.
Please note that removing a quiz from a lesson does not remove the questions from the quiz. This means that if you change your mind and add the quiz back to the lesson, the questions will also be restored.
Reordering Questions
To change the order that questions appear in the quiz:
- Click the question to select it.
- In the toolbar, click the arrows to move the question up or down in the list.
Quiz Settings
Quiz settings are available in the sidebar after selecting the Quiz block:

- Pass Required – Enabling Pass Required means that learners need to achieve a particular grade before the lesson can be marked as completed. If disabled, the passmark defaults to 0, and the learner can complete the lesson without passing the quiz.
- Passing Grade (%) – Passing Grade is the percent grade that must be obtained by the learner in order to pass the quiz. This setting is only visible if Pass Required is checked.
- Auto Grade – When Auto Grade is enabled, all multiple choice, true/false, and gap fill questions are automatically graded. Questions must have at least 1 point assigned in order to be eligible for auto-grading.
- Allow Retakes – If Allow Retakes is selected, the learner is able to reset the quiz and take it again.
- Random Question Order – Selecting Random Question Order displays the questions in a different order every time a quiz that has not been completed is viewed.
- Number of Questions – You can optionally choose to limit the number of questions to display to the learner by entering a value for Number of Questions. The questions are randomly selected.
Lessons Without a Quiz
If there is no quiz associated with a lesson, the lesson will display a Complete Lesson button. This button enables learners to mark the lesson as complete and move to the next one.
Quiz Management – Legacy*
*This section is only applicable for those who are still using the legacy meta boxes, rather than blocks, to manage quizzes.
There are a couple of scenarios in which meta boxes are used for quiz management:
- The block functionality has been intentionally disabled by hooking into
sensei_quiz_enable_block_based_editor. - New question types have been added by hooking into
sensei_question_types.
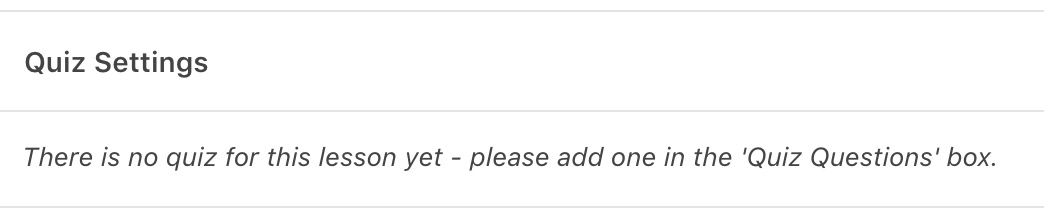
When adding a new lesson, you will find the Quiz Settings panel below the main content area, with a message indicating that there is no quiz for this lesson (yet!). You will need to save the lesson before you will be able to create the quiz:
There are three methods available for adding questions to a quiz on the Edit Lesson screen. You can add a new question, add an existing question, or add a category question(s). Please note that category questions will not appear unless you have created at least one category under Questions > Categories in your dashboard.
New Question
Please see the Question Bank documentation for information on how to add new questions. It’s worth noting that when a new question is added to a quiz, that question is also added to the question bank, so that it can be used again in other quizzes:
Existing Questions
The Existing Questions tab enables you to select one or more existing questions from the question bank and add them to the quiz. You can search for a question by name, or filter by question type and question category. You can also search for questions that either have or haven’t already been used in another quiz:

The panel displays 10 questions per page. Remember that selections are not preserved between pages, so you must select and add questions from one page before moving to the next.
Category Questions
The Category Questions tab enables you to insert a random selection of questions from a question category. After selecting a category from the dropdown and entering the number of questions to display, questions in that category are added to the quiz. They appear as a single entry in the table:


You can add multiple groups of category questions to the quiz:

You can also combine existing questions with category questions. Sensei LMS ensures that a question is not displayed more than once in the same quiz:

Removing Questions
To remove a question or group of questions from a quiz, click the Remove link in the Quiz Questions table. This will not remove the question from the question bank. To do that, go to Questions > All Questions, hover over the question, and click the Trash link.
Quiz Settings
Once you’ve added questions to your quiz, you can customize the settings in the Quiz Settings panel:
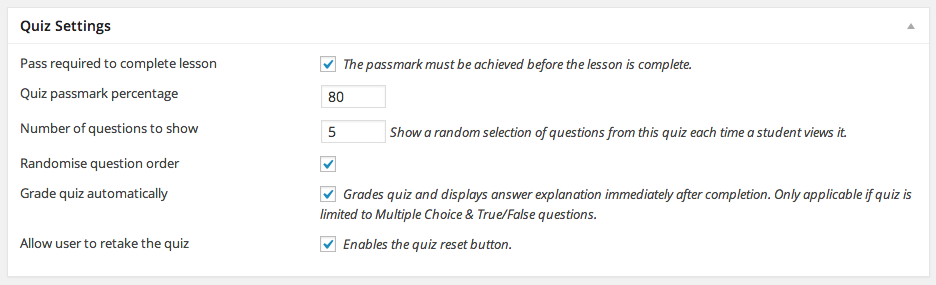
- Pass required to complete lesson – Checking Pass required to complete lesson forces learners to achieve a particular grade before the lesson can be marked as completed. If left unchecked, the passmark defaults to 0, and the learner can complete the lesson without passing the quiz.
- Quiz passmark percentage – Quiz passmark percentage is the grade that must be obtained by the learner in order to pass the quiz. This setting is only visible if Pass required to complete lesson is checked.
- Number of questions to show – You can optionally choose to limit the number of questions that are displayed when the quiz is taken by entering a value for Number of questions to show.
- Randomise question order – Selecting Randomise question order will display the questions in a different order every time the quiz is viewed.
- Grade quiz automatically – All multiple choice, true/false, and gap fill questions will be auto-graded if Grade quiz automatically is checked.
- Allow user to retake the quiz – If Allow user to retake the quiz is selected, the learner is able to reset and take the quiz again if they like.
To add a lesson, go to Lessons > Add New. You will see that some blocks have already been added to the page for you. (Note: If you use Divi, you will need to go to Divi > Theme Options > Builder and disable Lessons in order to see the blocks.)
These blocks can be customized, reordered or removed:
Lesson Properties
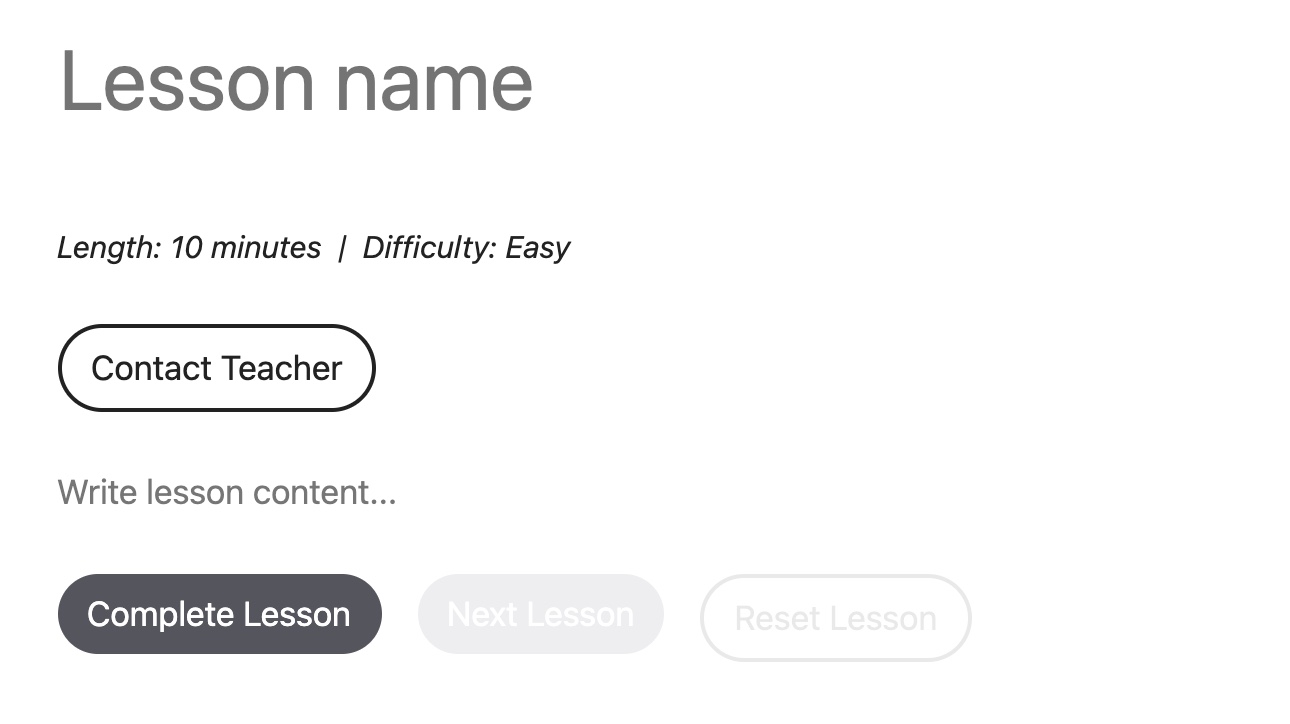
The Lesson Properties block displays the length of time (in minutes) that the lesson is expected to take, as well as the difficulty level (Easy, Standard or Hard).
Contact Teacher
The Contact Teacher block is the same as the one that appears on the course page. It enables registered users to contact the teacher.
Lesson Actions
The Lesson Actions block is a group of buttons that enables a learner to perform specific actions for a lesson. These include marking the lesson as complete, viewing the quiz, resetting the lesson or moving to the next lesson. Each of these buttons can have their style, colours and border changed.
The visibility of some of these buttons depends on certain conditions to be met. For example, the Take Quiz button only appears in the editor and for learners if there is a quiz associated with the lesson.
Additionally, some actions may appear disabled in the editor. This is because they depend on whether or not the learner has completed the lesson. For example, it does not make sense to show the Complete Lesson button if the learner has already completed it. Similarly, it does not make sense to show the Reset Lesson button if the learner hasn’t finished it yet.
You can toggle between these two states, in progress and completed, by selecting the Lesson Actions block and choosing a different option from the dropdown in the toolbar:
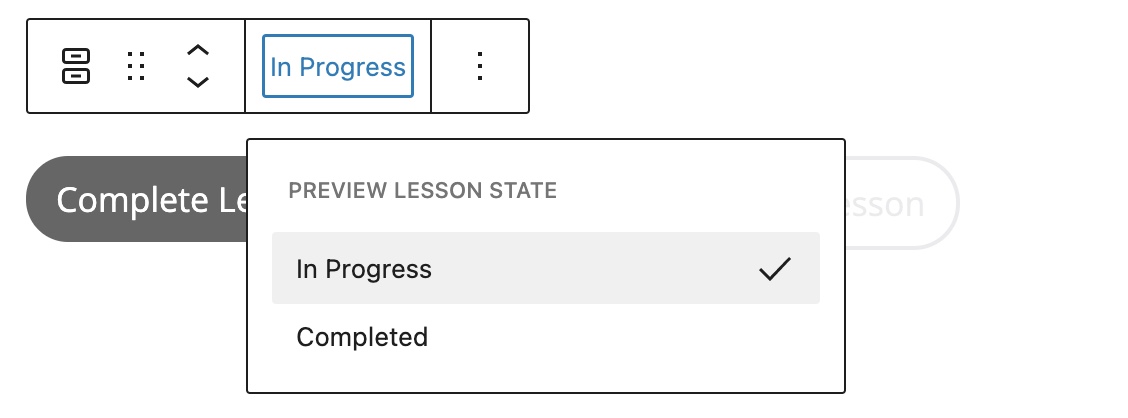
Alternatively, you can click on any of the buttons in the block to toggle the state. This enables you to see what the learner will see depending on whether or not they have completed the lesson.
You can add additional content and blocks such as images and videos to the editor, just as you would for any other type of post.
Note: If no Sensei blocks exist on the lesson page, the lesson will use a legacy PHP template to provide the same functionality to your site visitors. Since PHP templates can be difficult to customize, we recommend that you use blocks instead.
Document Settings
There are some additional settings in the sidebar that can be configured for the lesson.
Lesson Tags
You can add tags to lessons in the same way as you can with regular posts. Lesson tags can be managed by going to Lessons > Lesson Tags. If you would like lessons to be searchable by tag, you will need to use a search plugin such as Search WP.
Featured Image
A featured image can be added to a lesson by uploading an image from your computer or selecting an existing one from the Media Library:
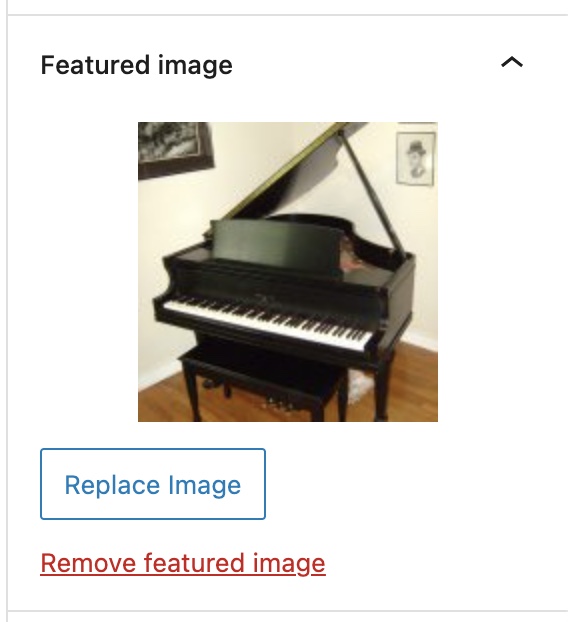
The image is displayed on the lesson page above the lesson name. Alternatively, you can embed an image anywhere in your content by adding an Image block right inside the editor.
Excerpt
If you like, you can enter a brief description of the lesson in the Excerpt field. The excerpt is displayed to those who haven’t enrolled in the course:

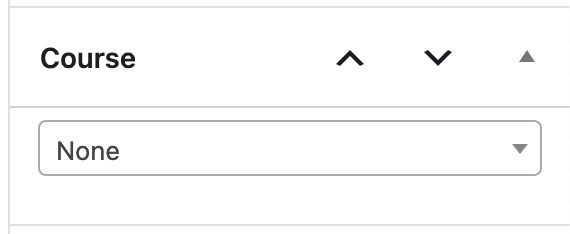
Course
In the Course panel, select the course that the lesson should be associated with. A lesson can only be associated with a single course:
Note: We don’t recommend adding a lesson to a course that is already live and has active learners. See this page for more information.
Module
See Modules to learn more about how to assign lessons to modules.
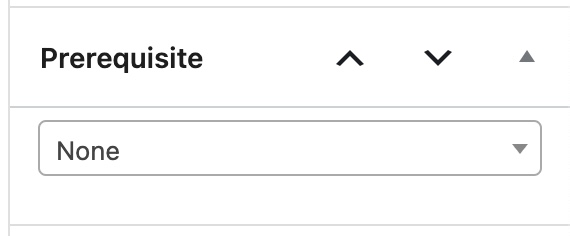
Prerequisite
If you would like learners to complete another lesson before taking this one, you can set a Prerequisite. Learners will not be able to start taking this lesson until they complete the prerequisite lesson first:
If a learner tries to view this lesson without having first completed the prerequisite lesson, they will see a notice similar to the following:

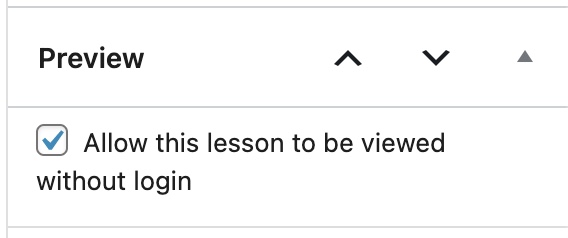
Preview
To offer a free sample of your course content, you can select Allow this lesson to be viewed without login. This will enable the lesson content to be viewable by anyone, including anonymous visitors to your site:
Order Lessons
To change the order that your lessons are displayed in, go to Lessons > Order Lessons. Select the course, and then drag and drop the lessons into the desired order. Click the Save lesson order button to save your changes.
Lessons that are inside a module can only be re-ordered within their respective module. In order to move a lesson to another module, you will need to edit the lesson and associate it with a different module.
Duplicate a Lesson
- Go to Lessons > All Lessons.
- Hover over a lesson.
- Click the Duplicate link.
- In the dialog box that appears, click OK.
A module is a container for a group of lessons in a course. Conceptually, they exist as an additional level between courses and lessons in the content hierarchy. A course can contain any number of modules, and every lesson in the course can be assigned to a single module.
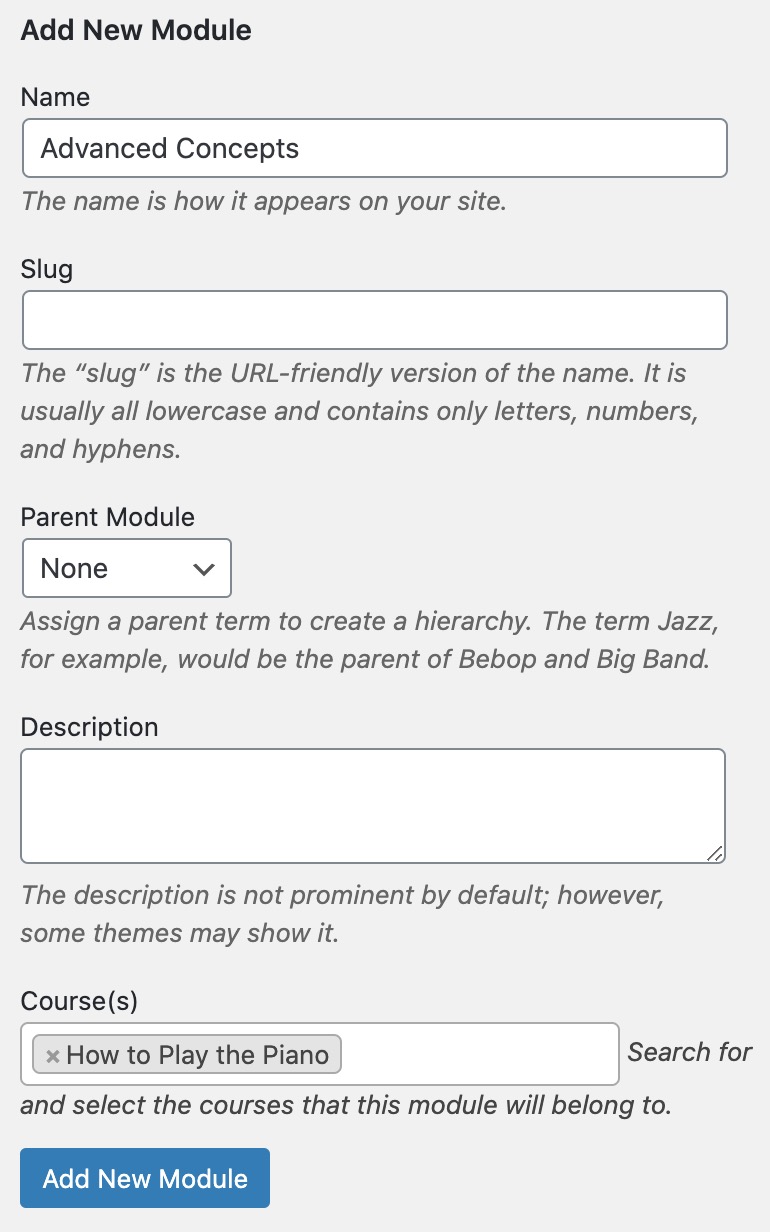
Add a New Module
To add a module:
- Go to Courses > Modules.
- Give the module a name.
- Enter an optional description. (Leave this blank if you are only using modules conceptually and don’t want them to appear as a separate page in your course.)
- Under Course(s), search for and select one or more courses that will use this module. Alternatively, you can leave the Course(s) field blank and assign modules later when adding or editing a course.
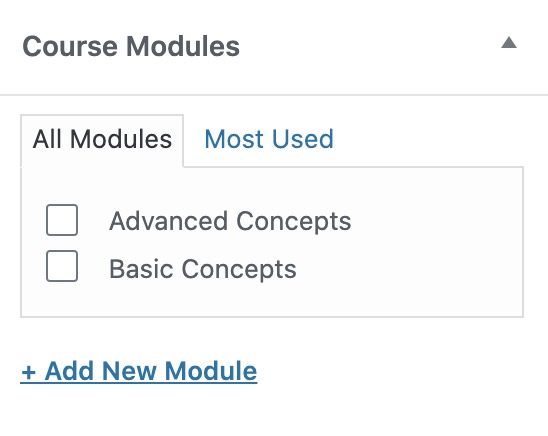
Add Modules to a Course
You can also add modules when creating or editing a course:
- Go to Courses > All Courses.
- Click Add New or select an existing course.
- In the Course Modules panel in the sidebar, select the modules you would like to add to the course. You can also add a new module by clicking the + Add New Module link.
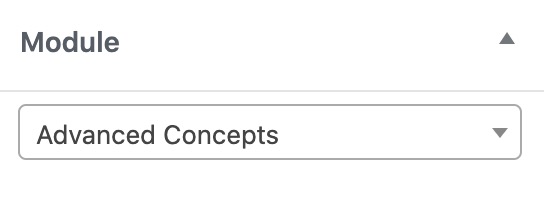
Add a Module to a Lesson
After you have added modules to a course, you can assign a module to each lesson in that course.
To assign a module to a lesson:
- Go to Lessons > All Lessons.
- Select an existing lesson.
- In the Modules panel in the sidebar, select a module to associate with this lesson.
Order Modules
By default, any modules that are added to a course are displayed in alphabetical order. To use a custom order, go to Courses > Order Modules. Select a course, drag and drop the modules into the desired order, and then click the Save module order button.
To add a course, go to Courses > Add New. You will see that some blocks have already been added to the page for you. (Note: If you use Divi, you will need to go to Divi > Theme Options > Builder and disable Courses in order to see the blocks.)
These blocks can be customized, reordered or removed:
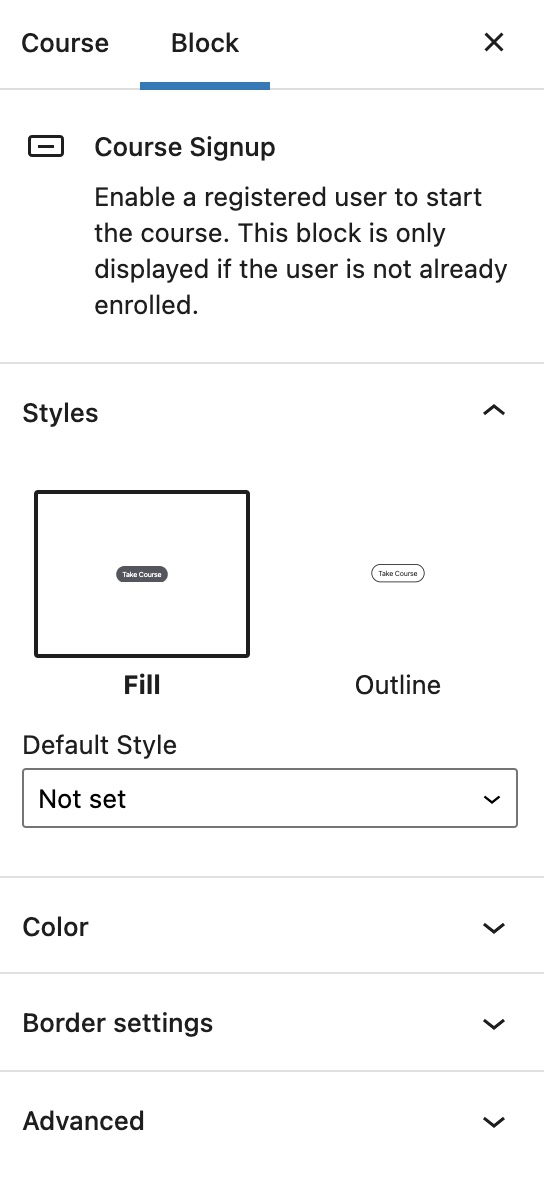
Course Signup
The Course Signup block displays a Take Course button that enables a registered user to enrol in the course. Once enrolled, the button is no longer visible to them. Because this is such a critical piece of functionality, we recommend that you leave this block on the page.
The block can be customized by changing its style, colors or border:
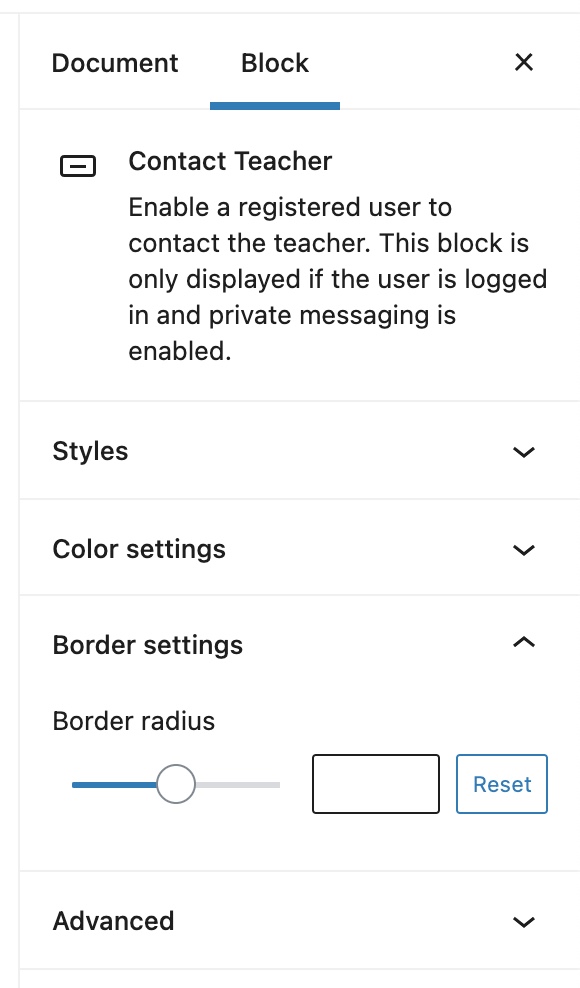
Contact Teacher
The Contact Teacher block enables registered users to contact the teacher. The user is not required to be enrolled in the course in order to send a message to the teacher. This provides an opportunity for them to learn more about the course before deciding whether or not to enrol. The private messaging function, however, needs to be enabled in order for the button to display.
Similar to Course Signup, the Contact Teacher block can have its style, colors and border customized:
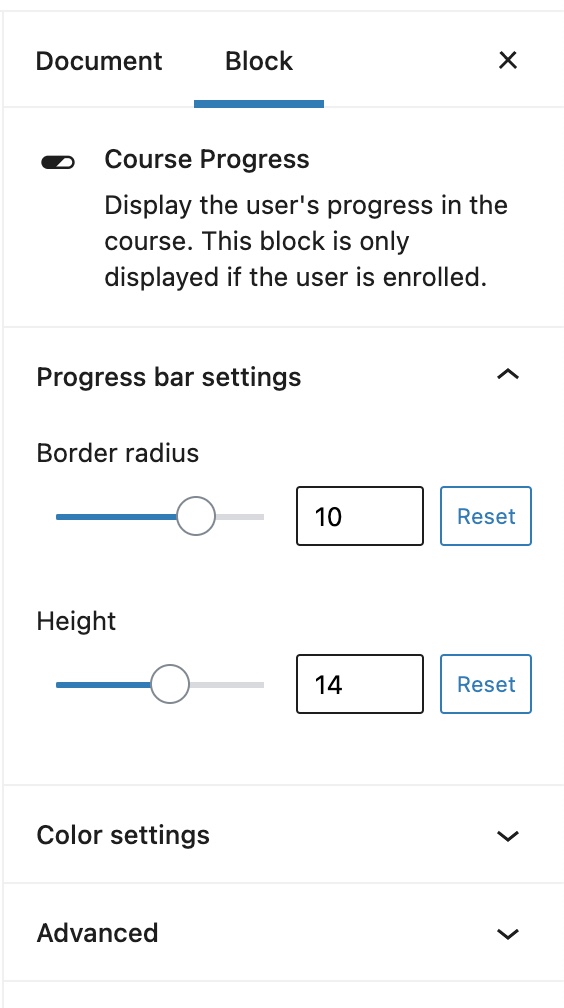
Course Progress
Course Progress displays the learner’s progress in the course. This block is only visible to people who are already enrolled. The course progress block enables you to customize the border radius, progress bar height and colors:
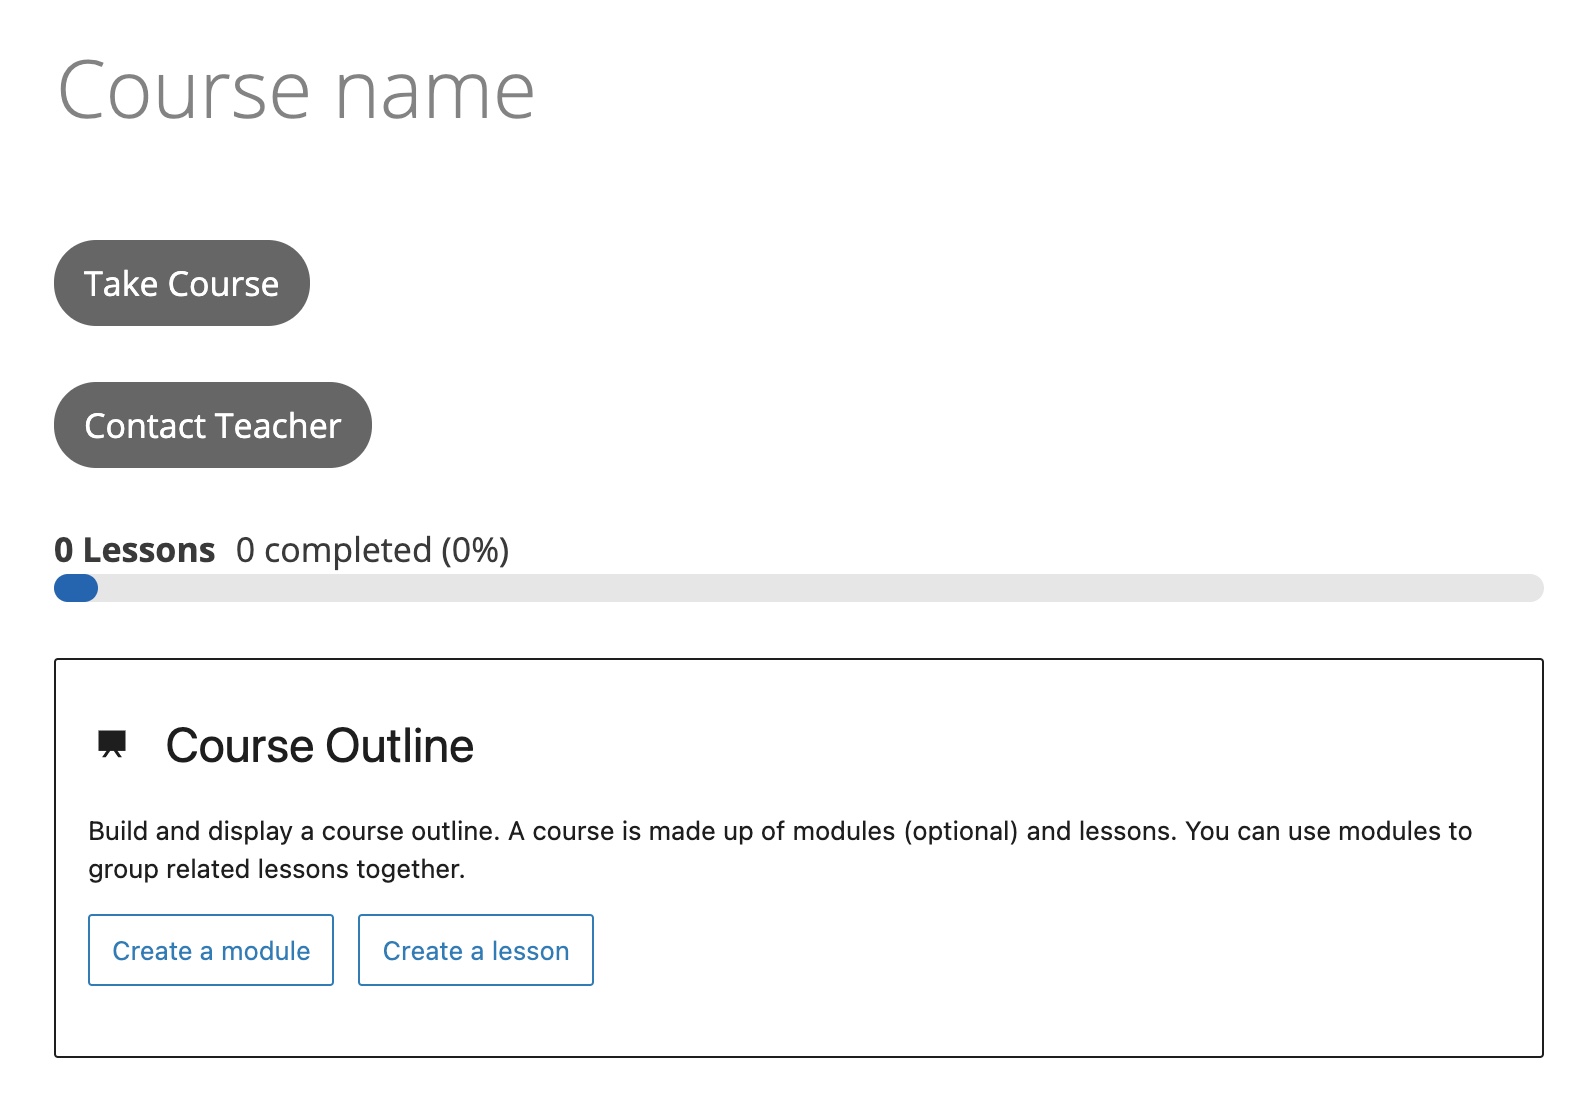
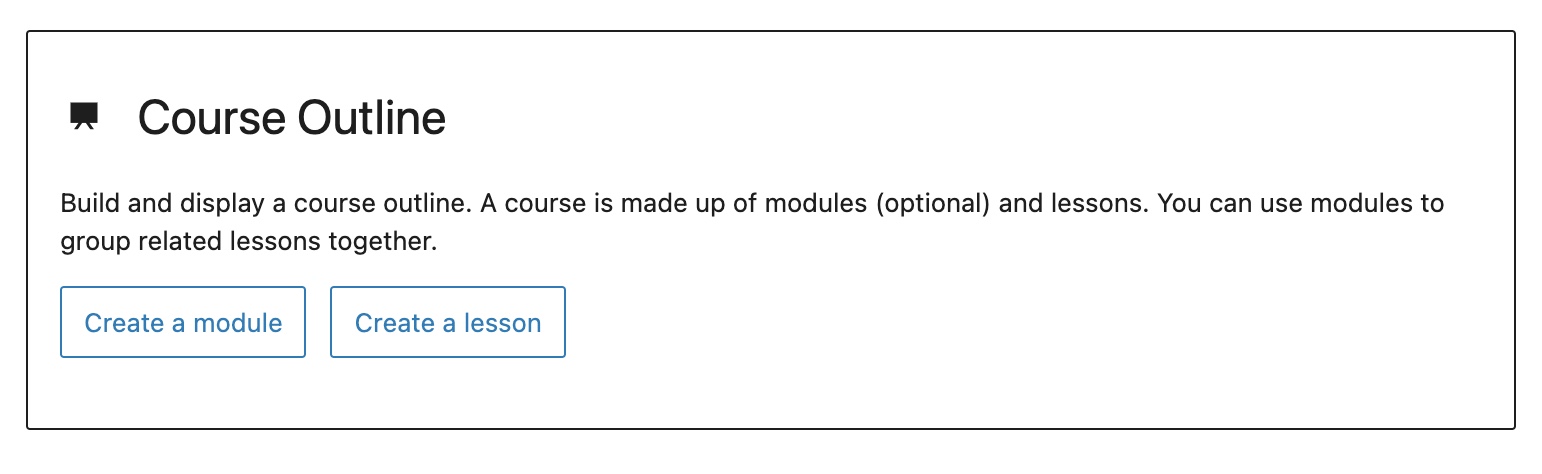
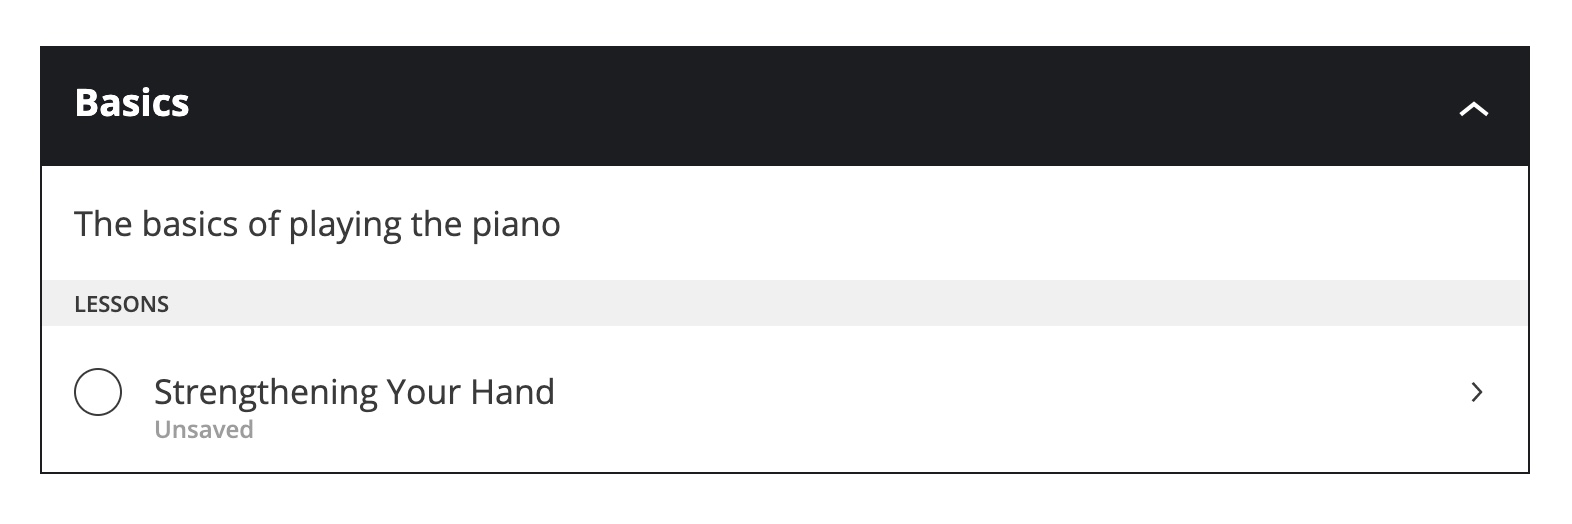
Course Outline
In addition to displaying the modules and lessons that make up a course, the course outline block enables you to build your course structure right inside the editor. Any modules or lessons you add to the block will be created automatically once the course is saved.
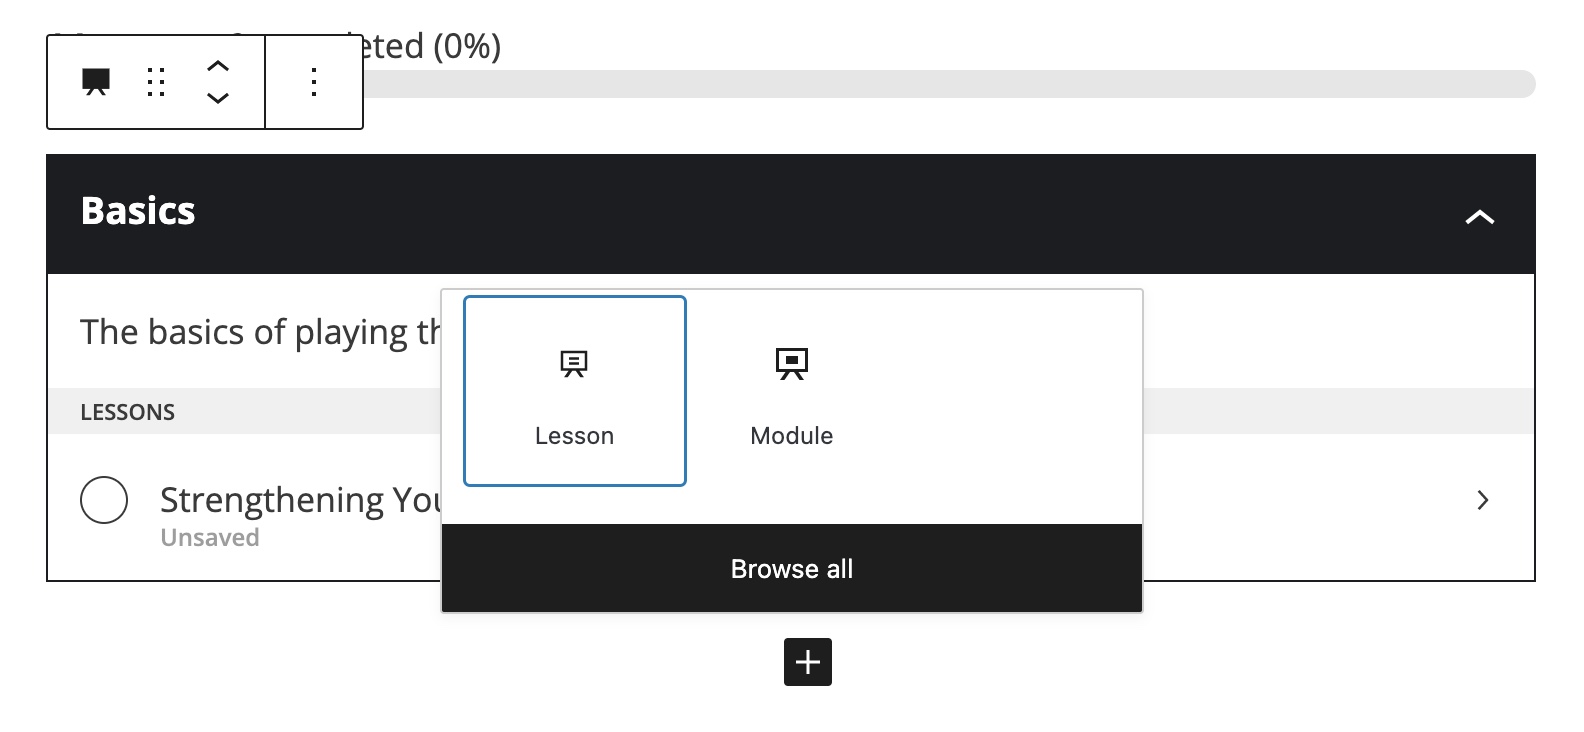
The first step is to decide whether you would like to create a module, which is a collection of lessons, or a single lesson:
After clicking on Create a module, the block changes to enable you to specify the name and description of the module, as well as the name of the lesson:
Additional modules and lessons can be added by selecting the Course Outline block, and then clicking the + icon:
Alternatively, a blank lesson will be added for you when the block is selected, or when you start typing a lesson name.
The parent Course Outline block, module, and lesson each have their own settings:

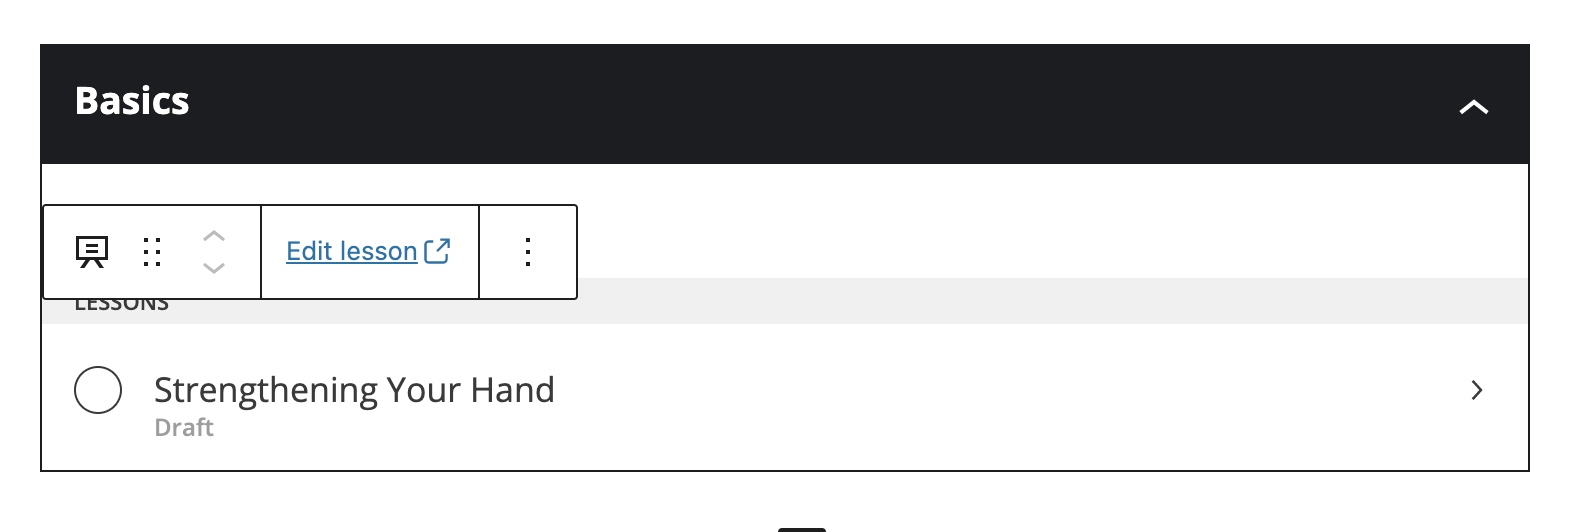
It’s important to note that lessons must be published before they will be displayed on your site. You can publish a lesson from the course outline block by saving the course, selecting a lesson, and then clicking the Edit lesson link in the toolbar or sidebar. This will open the lesson in a new tab, and you can publish it from there:
You can add additional content and blocks such as images and videos to the editor, just as you would for any other type of post.
Note: If no Sensei blocks exist on the course page, the course will use a legacy PHP template to provide the same functionality to your site visitors. Since PHP templates can be difficult to customize, we recommend that you use blocks instead. Learn more.
Conditional Content
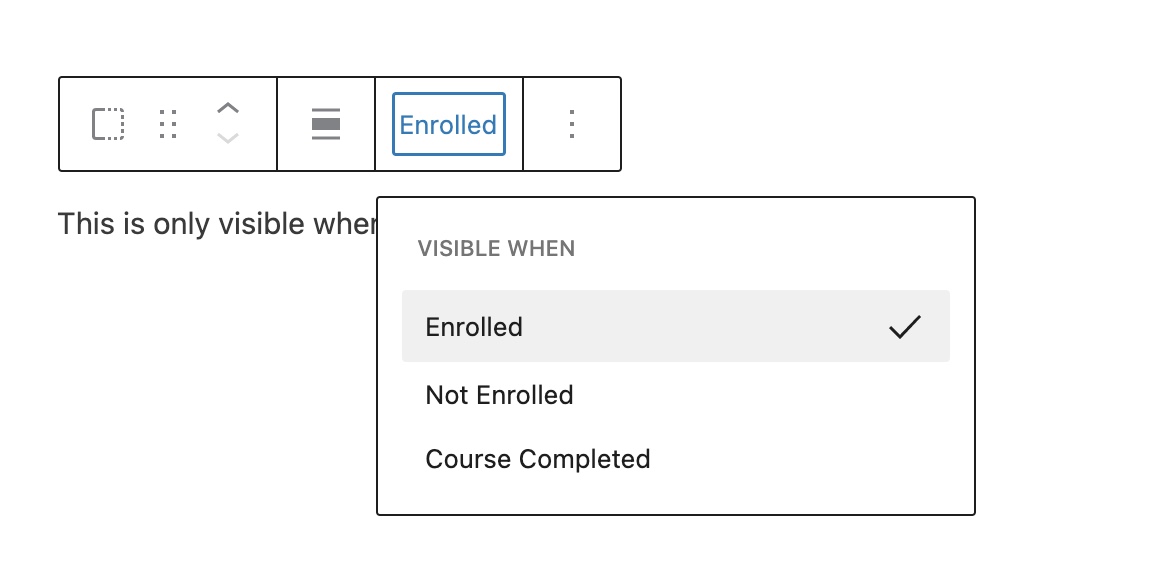
Although not added to the course page by default, the Conditional Content block is an additional Sensei block that is available to add to your courses. Any content added inside this block is only displayed if your site visitor is enrolled in the course, is not enrolled in the course, or has completed the course.
The visibility condition can be set by clicking on the block and selecting a value from the toolbar dropdown. You can add as many blocks inside Conditional Content as you like:
Document Settings
There are some additional settings in the sidebar that can be configured for the course.
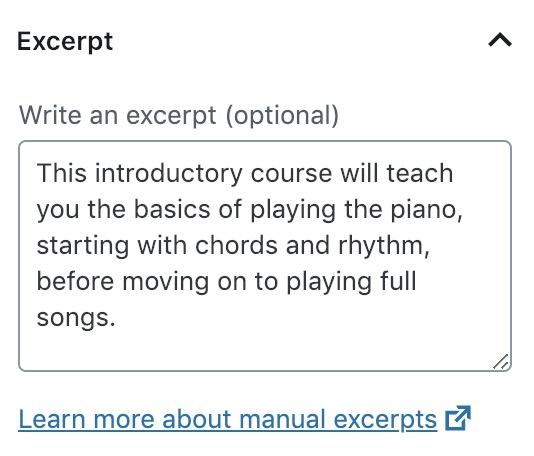
Excerpt
If you like, you can enter a brief description of the course in the Excerpt field:
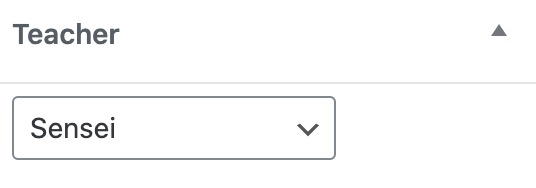
Teacher
To assign a teacher to the course, choose a user from the Teacher dropdown:
Course Categories
A course can be assigned to one or more categories. You can select an existing category or click the Add New Course Category link to create a new one:
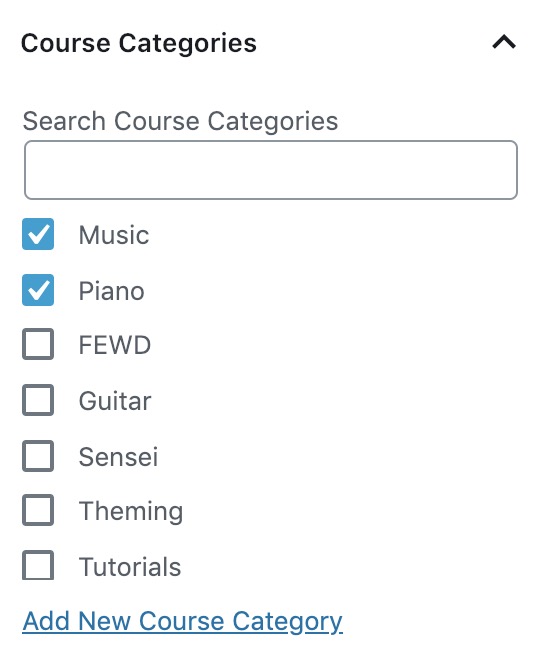
Course categories can be managed by going to Courses > Course Categories.
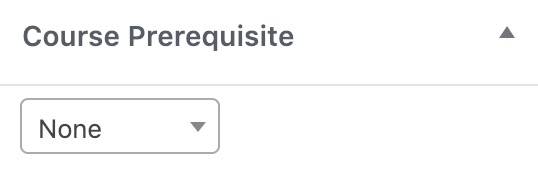
Course Prerequisite
If you would like learners to complete another course before taking this one, you can set a Course Prerequisite. Learners will not be able to start taking this course until they complete the prerequisite course first:
If a learner tries to view this course without having first completed the prerequisite course, they will see a notice similar to the following:

Featured Course
To feature a course, select the Feature this course box. The course will then be displayed under Featured Courses on the course archive page and in the course component widget:

Featured Image
A featured image can be added to a course by uploading an image from your computer or selecting an existing image from the Media Library. The image displays on the course archive and course pages, depending on the settings configured in Sensei LMS > Settings > Courses:
Course Notifications
There is a Course Notifications panel on the course edit screen that gives you the option to disable all email notifications for just that course. This option overrides the global email options in Sensei LMS > Settings > Email Notifications:

Order Courses
To change the order that your courses are displayed in, go to Courses > Order Courses. Drag and drop them into the desired order, and then click the Save course order button.
Duplicate a Course
- Go to Courses > All Courses.
- Hover over a course.
- Click the Duplicate link to duplicate just the course, or Duplicate (with lessons) to duplicate the course and all its lessons.
Edit a Course
Once your course is published and people have started taking it, we recommend against making major changes such as adding or removing lessons, editing quizzes, etc. Doing so will affect the grades and completion status of learners who are already taking (or have already completed) the course. Minor text edits are fine, but anything that will affect the overall completion status should be avoided.
If you decide that your course needs a refresh with new lessons or more quizzes, the best solution would be to either create a new version of the course from scratch, or duplicate the existing course and make the required updates before publishing.